Showing posts with label FreeNAS. Show all posts

Saturday, December 26, 2020

E-Mail notifications in FreeNAS using Gmail

Setting up email alerts is a smart way of making sure nothing unexpected happens on a FreeNAS server without knowing about it or having to check the UI every now and then. A "should be straigthforward" way ough to be setting up a gmal account as the outgoing email. Nevertheless, it is not as simple as clicking "yeah, sure, email me".

Objective

Get a working E-Mail notification from FreeNAS by using a Gmail E-Mail address for sending the messages.

Overview

FreeNAS needs an smtp server and corresponding E-Mail account credentials to send E-Mails. E-Mails cannot be sent directly from within FreeNAS without an E-Mail server. Additionally, using a Gmail address with the corresponding account password does not work either.  The steps to get such a setup running are briefly as follows,

  1. Get a Gmail E-Mail address,
  2. Allow "App password" access to the E-Mail account, and
  3. Set up FreeNAS E-Mail service.

Settings in the Google account

This is the first step in configuring sending E-Mails through a gmail account. Basically, a new App passsword is required for FreeNAS. Connecting and sending emails via the username and password merely did not work in my case, not even when enabling "Allow less secureapps". So to properly set up access the following needs to be done,

  1. Log in to the Google account.
  2. Go to Security.

    Google account securities tab

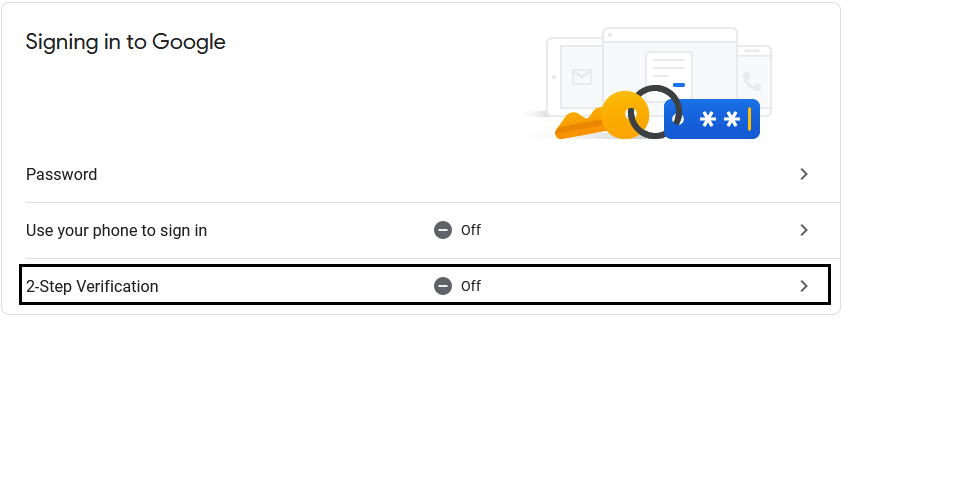
  3. Enable 2 Factor Authentication (this is required for step 4!).

    Enable two-step verification in the securities tab.

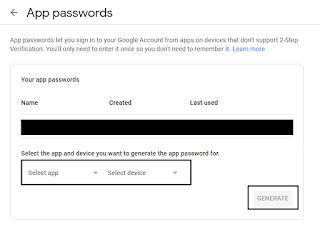
  4. Once 2 Factor Authentication is enabled, an option becomes avilable to create App passwords.

    App passwords option becomes available afect enabling 2FA
  5. Create a new App password and copy it to the clipboard.
    Generate a new App password for FreeNAS and copy it to the clipboard.

Once this is done, the settings from Gmail side are complete.

Settings in FreeNAS

  1. Go to System/Email and adjust the settings according to the details below.

    FreeNAS System/Email settings showing the fields to make it work with Gmail
    From E-Mail: ChooseItToYourLiking
    Outgoing Mail Server: smtp.gmail.com
    Mail Server Port: 465
    Security: SSL (Implicit TLS)
    SMTP Authentication: Ticked
    Username: example@gmail.com
    Password: YourAppPassword

Once this is done, a test E-Mail can be sent by clicking "SEND EMAIL". If all above steps were followed, a test notification wil arrive in the E-Mail box associated with the root user (!). Following this, an alert service can be set up as well. Without too much details,

  1. Go to System/Alert Services.
  2. Click "Add" and choose Type/Email.
  3. Fill out your email address and click "SEND TEST ALERT".

This should be working now as well and the type of alerts cn be configured based on user needs.

Monday, December 21, 2020

FreeNAS home server backups Done Right

There are plenty of guides explaining how to back up FreeNAS - now TrueNAS - servers. Personally, I found them either vague in what they actually back up and what will be the final outcome or they get way too complicated for people of home NAS servers who want something that "just works". So here it is how I am periodically backing up my FreeNAS server to USB external drives.

Expected Result


Inspect the following example layout of a Source_Pool and an empty Destination_Pool. I will adhere to this naming in the rest of the post. Also, make sure you understand every command before following the steps. Working with root access is always risky and data can be lost, previous backups mistakenly overwritten.


Source_Pool        ==>This is the main pool we want to backup.
    ---Dataset1        ==> This is a dataset within the pool.
    ---Dataset2
        ---Sub-dataset
    ---Dataset3

Destination_Pool                 ==>This is the destination pool we want to backup TO.
    ---Backup_Source_Pool     ==> This is the top-level dataset that will be created of the source pool.
        ---Dataset1
        ---Dataset2
            ---Sub-dataset
        ---Dataset3

Note how the original datasets of the Source_Pool all appear under Destination_Pool/Backup_Source_Pool. This means that another pool (say Source_Pool#2, not shown in the example above) may also be backed up to the Destination_Pool, e.g. to a dataset called Destination_Pool/Backup_Source_Pool#2. This would then also contain the full dataset and child dataset layout of this Source_Pool#2. Provided that the Destination_Pool has enough capacity, several pool dataset may be backed up to for example, a single USB drive.

Considerations

 
  • Data deliberately deleted over time from Source_Pool should also be deleted on the Destination_Pool inside the backups. I do not want to hoard data that I deleted for a good reason.
  • The snapshot used for backing up data must not be deleted until a newer backup was made using another, newer snapshot. In other words, always keep the latest snapshot of the system. Deleting all snapshots will require a full backup of the entire pool.
  • Permissions and ACLs are retained.

If in any doubt, check man zfs.

Overview

The general idea is to create an initial snapshot of the Source_Pool and use zfs send | zfs receive to send it over to the Destination_Pool into an existing dataset named Backup_Source_Pool. Once the initial backup is done, future backups can be done as incremental, which requires two snapshots to exist, where the backup will transfer only the changes between the two snapshots. In simple terms this means that at the very least two snapshots must exist on the Source_Pool to use incremental backups.
  1. Identify source and destination datasets where backups should be made from and to.
  2. Create a snapshot of the source dataset.
  3. Send and receive dataset stream using zfs send | zfs receive to destination pool.
  4. For future backups, send incremental backups using the same method.

Initial Backup

  1. Create an initial snapshot of Source_Pool. I prefer doing this through the UI using a recursive snapshot. (Recursive means that all Datasets within Source_Pool will also be snapshotted, otherwise only data directly in the main Dataset directory will be snapshotted! Short: if you want the entire Pool, use recursive.)
    Note: I highly recommend using and sticking to a naming style for snapshots. I am using,
    Source_Pool@BACKUP-20200814
    and will adhere to this.
  2. Create a dataset called Backup_Source_Pool under the Destination_Pool. I prefer doing this from the UI as well.
  3. Use ssh to log in to the FreeNAS server and verify the snapshot is there,
    zfs list -t snapshot

    if thre are too many snapshots, search for the correct one, e.g.

    zfs list -t snapshot | grep @BACKUP-20200814

  4. Assuming both Source_Pool and Destination_Pool are present and mounted in the system, proceed by making the initial backup. Note: this requires root access, so
    sudo -i

    (sudo zfs send ... Does not work!) 

    zfs send -Rv Source_Pool@BACKUP-20200814 | zfs receive -Fdu Destination_Pool/Backup_Source_Pool
A bit of explanation from man zfs,
R --  Generate a replication stream package, which will replicate the specified filesystem, and all descendent file systems, up to the named snapshot. When received, all properties, snapshots, descendent file systems, and clones are preserved.
v --  Print verbose information about the stream package generated.
F -- Force a rollback of the filesystem to the most recent snapshot before performing the receive operation.
d -- Use the name of the sent snapshot to determine the name of the new snapshot as described in the paragraph above. See man zfs for more accurate info.
u --  Newly created file system is not mounted. (Translation: when inspecting from the UI, the copied dataset will be visible, however, going over ssh manually to /mnt/Backup_Source_Pool will show up empty. No need for panic, the data is there, its is merely not mounted. I usually cannot mount a single directory using zfs mount Backup_Pool - due to I suspect some shares being mounted or similar - but zfs mount -a works just fine and the data "shows up".
 

Incremental Backup

 
This will only work if,
  1. you already have an initial backup, and
  2. you still have the snapshot of that backup (including the snapshots of all Sub-datasets if it was a recursive snapshot). 
Otherwise you will get an error. Unfortunately, this means that if the first Snapshot is no longer available, an incremental backup cannot be made and a new, initial backup has to be made, transferring all the data again. Otherwise, since only the change between the latest and previous snapshot is transferred, the backup speed is greatly increased.

Note that the following code will transfer only the differences between two Snapshots and data that was removed from Source_Pool will also be deleted on Destination_Pool during the backup. To make an incremental backup, the -i option is used followed by the old and new snapshot names after one another.
  1. Create a new recursive snapshot, this will be,
    Source_Pool@BACKUP-20200815
  2. Use ssh to log in to the FreeNAS server and check the Snapshots available
    zfs list -t snapshot | grep Source_Pool@BACKUP
    Hopefully there will be,
    Source_Pool@BACKUP-20200814

    Source_Pool@BACKUP-20200815

  3. Assuming both Source_Pool and Destination_Pool are present and mounted in the system, proceed by making the incremental backup. Note: this requires root access, so

    sudo -i
    (sudo zfs send ... Does not work!)
    zfs send -Rv -i Source_Pool@BACKUP-20200814 Source_Pool@BACKUP-20200815 | zfs receive -Fdu Destination_Pool/Backup_Source_Pool

Note that here the -i argument is added which stands for "incremental backup", man zfs. This requires two distinct snapshots to exists on the Source_Pool and the older of the two snapshots to exist on the Destination_Pool.
i -- Generate an incremental stream from snapshot1 to snapshot2. The incremental source snapshot1 can be specified as the last component of the snapshot name (for example, the part after the "@"), and it is assumed to be from the same file system as snapshot2.

Similarly to the initial backup, the Destination_Pool is unmounted when done.
 

Snapshot keeping strategy

Since for the incremental backups at least two Snapshots are needed, I always keep a minimum of two recursive snapshots of my system. This is a balance between storage space and ability to create backups or roll back to previous snapshots.

Technically between backups one can just keep a single Snapshot on the Source_Pool. Then, when backup day arrives, make a new Snapshot, do an incremental backup between the two Snapshots - the older of which exists on the Destination_Pool - and thendelete again the older snapshot of the two from Source_Pool.

In other words, for incremental backups to work, a Snapshot must not be deleted until another backup was made since that snapshot.

Reference

 
Not really necessary perhaps, but for simplicity here are some excerpts from man zfs relating to zfs send and zfs receive.
zfs send [-DvRp] [-[iI] snapshot] snapshot
Creates a stream representation of the second snapshot, which is written to standard output. The output can be redirected to a file or to a different system (for example, using ssh(1). By default, a full stream is generated.

-D

Perform dedup processing on the stream. Deduplicated streams cannot be received on systems that do not support the stream deduplication feature.
-i snapshot
Generate an incremental stream from the first snapshot to the second snapshot. The incremental source (the first snapshot) can be specified as the last component of the snapshot name (for example, the part after the @), and it is assumed to be from the same file system as the second snapshot.

If the destination is a clone, the source may be the origin snapshot, which must be fully specified (for example, pool/fs@origin, not just @origin).

-I snapshot
Generate a stream package that sends all intermediary snapshots from the first snapshot to the second snapshot. For example, -I @a fs@d is similar to -i @a fs@b; -i @b fs@c; -i @c fs@d. The incremental source snapshot may be specified as with the -i option.
-R
Generate a replication stream package, which will replicate the specified filesystem, and all descendent file systems, up to the named snapshot. When received, all properties, snapshots, descendent file systems, and clones are preserved.

If the -i or -I flags are used in conjunction with the -R flag, an incremental replication stream is generated. The current values of properties, and current snapshot and file system names are set when the stream is received. If the -F flag is specified when this stream is received, snapshots and file systems that do not exist on the sending side are destroyed.

-p
Send properties.
-v
Print verbose information about the stream package generated.
The format of the stream is committed. You will be able to receive your streams on future versions of ZFS
 
zfs receive [-vnFu] filesystem|volume|snapshot

zfs receive
[-vnFu] [-d | -e] filesystem
Creates a snapshot whose contents are as specified in the stream provided on standard input. If a full stream is received, then a new file system is created as well. Streams are created using the zfs send subcommand, which by default creates a full stream. zfs recv can be used as an alias for zfs receive.

If an incremental stream is received, then the destination file system must already exist, and its most recent snapshot must match the incremental stream's source. For zvols, the destination device link is destroyed and recreated, which means the zvol cannot be accessed during the receive operation.

When a snapshot replication package stream that is generated by using the zfs send -R command is received, any snapshots that do not exist on the sending location are destroyed by using the zfs destroy -d command.

The name of the snapshot (and file system, if a full stream is received) that this subcommand creates depends on the argument type and the -d or -e option.

If the argument is a snapshot name, the specified snapshot is created. If the argument is a file system or volume name, a snapshot with the same name as the sent snapshot is created within the specified filesystem or volume. If the -d or -e option is specified, the snapshot name is determined by appending the sent snapshot's name to the specified filesystem. If the -d option is specified, all but the pool name of the sent snapshot path is appended (for example, b/c@1 appended from sent snapshot a/b/c@1), and if the -e option is specified, only the tail of the sent snapshot path is appended (for example, c@1 appended from sent snapshot a/b/c@1). In the case of -d, any file systems needed to replicate the path of the sent snapshot are created within the specified file system.

-d

Use all but the first element of the sent snapshot path (all but the pool name) to determine the name of the new snapshot as described in the paragraph above.
-e
Use the last element of the sent snapshot path to determine the name of the new snapshot as described in the paragraph above.
-u
File system that is associated with the received stream is not mounted.
-v
Print verbose information about the stream and the time required to perform the receive operation.
-n
Do not actually receive the stream. This can be useful in conjunction with the -v option to verify the name the receive operation would use.
-F
Force a rollback of the file system to the most recent snapshot before performing the receive operation. If receiving an incremental replication stream (for example, one generated by zfs send -R -[iI]), destroy snapshots and file systems that do not exist on the sending side.

Sunday, November 8, 2020

One or more devices has experienced an unrecoverable error. An attempt was made to correct the error. Applications are unaffected.

This is not message I wanted to see in my FreeNAS GUI when running brand new disks, but oh well.

First scrub on July 19 2020

I discovered the error on July 29 2020 when moving some 300 GB data to one of my mirrored pools. After the initial panic of "what is this?!" I logged in to my server over ssh and checked what has happened with zpool status.
zpoll status
pool: Tank
state: ONLINE
status: One or more devices has experienced an unrecoverable error.  An
        attempt was made to correct the error.  Applications are unaffected.
action: Determine if the device needs to be replaced, and clear the errors
        using 'zpool clear' or replace the device with 'zpool replace'.
  see: http://illumos.org/msg/ZFS-8000-9P
  scan: resilvered 24.8M in 0 days 00:00:01 with 0 errors on Sun Jul 19 00:00:32 2020
config:

        NAME                                                STATE     READ WRITE CKSUM
        SafeHaven                                           ONLINE       0     0     0
          mirror-0                                          ONLINE       0     0     0
            gptid/blip_disk1.eli  ONLINE       0     0     3
            gptid/
blip_disk2.eli  ONLINE       0     0     0

errors: No known data errors


Well, well, well. It seems that there were a few MB of data missmatch between the members of the mirror. As these are new disks, I am not particularly paniced for the moment, especially after reading the link above and reflecting a bit on recent events.
 

The likely culprit


During a maintenance/upgrade about two weeks ago one of the drives "fell out" of the pool due to a loosely attached SATA power cable and therefore my pool became "DEGRADED" (another word that one does not see with great pleasure in the GUI...). Since this pool was at the time used for the system log, as well as for my jails, the remaining one disk was still carrying out read/write operations thereby getting out of sync with the other - at the time OFFLINE - drive. In the end I managed to get the disk back in the pool, however, I imagine that the changes that happened on the first disk were not mirrored automatically upon re-ataching the second disk. That July 19 midnight seems like a scrub, which must have caught the data missmatch and fixed it.

In this case it is probably not a huge issue. I cleared the error message by dismissing it in the GUI and from the terminal as well via,
sudo zpool clear Tank gptid/blip_disk1.eli
and will continue to monitor the situation.

Another scrub on Aug 9 2020

The scrub this time also caught some things, and zpool status gave the following.

pool: Tank
 state: ONLINE
status: One or more devices has experienced an unrecoverable error.  An
        attempt was made to correct the error.  Applications are unaffected.
action: Determine if the device needs to be replaced, and clear the errors
        using 'zpool clear' or replace the device with 'zpool replace'.
   see: http://illumos.org/msg/ZFS-8000-9P
  scan: scrub repaired 12K in 0 days 06:29:41 with 0 errors on Sun Aug  9 06:53:43 2020
config:

        NAME                                                STATE     READ WRITE CKSUM
        SafeHaven                                           ONLINE       0     0     0
          mirror-0                                          ONLINE       0     0     0
            gptid/blip_disk1.eli  ONLINE       0     0     3
            gptid/blip_disk2.eli  ONLINE       0     0     0

errors: No known data errors
 
Now, during a nighly scub, another 12K was discovered and repaired. This was again on the same disk as previously and I am still wondering if this is not some leftover of the previously described issue. Perhaps something that was not caught last time? According to Yikues, scrub repaired 172K it could be anything or nothing since I am running server-grade hardware with ECC memory.  Either way, out of precaution I am doing the following:
  • create a snapshot,
  • refresh my backup,
  • schedule a long SMART test and
  • (if time allows) run a memtest.

Note: I know that some just love recommending running a memtest. However, looking at the issue, statistically, it is extremely unlikely that it is a memory issue as proper memory - which server-grade memory is  - should pass qality checks after manufacturing and they really rarely go bad.

If the SMART tests will be passed, I will call it a day and keep observing the system. If the SMART test throws back some errors or if the error happens another time on the same drive, I will contact the retailer as the drive is well withing garantee.

Drive S.M.A.R.T. status 

Checking the drive SMART status with

 sudo smartctl -a /dev/ada1 
revealed no apparent errors with the disk. SMART tests previously all completed without errors.

SMART Self-test log structure revision number 1
Num  Test_Description    Status                  Remaining  LifeTime(hours)  LBA_of_first_error
# 1  Short offline       Completed without error       00%      1404         -
# 2  Extended offline    Completed without error       00%      1329         -
# 3  Short offline       Completed without error       00%      1164         -
# 4  Short offline       Completed without error       00%       996         -
# 5  Short offline       Completed without error       00%       832         -
# 6  Short offline       Completed without error       00%       664         -
# 7  Short offline       Completed without error       00%       433         -
# 8  Short offline       Completed without error       00%       265         -
# 9  Extended offline    Completed without error       00%       190         -
#10  Extended offline    Completed without error       00%        18         -
#11  Short offline       Completed without error       00%         0         -

Memtest

Came back clean. I am not particularly surprised here.

Status on 08 November 2020

A few months have passed since I started writing this post. In the meanwhile I was monitoring the situation and did not discover any further issues. The pool is running fine and no further scrubs reported any errors. I am therefore concluding that the issue was caused most likely by the above malfunction and has nothing to do with the drive itself.


Friday, July 24, 2020

Syncthing jail on FreeNAS: "RuntimeError: mount_nullfs:"


Reason

This error arises when one tries to first stop a jail, add new mount point and then try to start the jail back up. This then presents an error message and the jail will not start up. I presume in my FreeNAS-11.2-U8 the underlying issue is that adding a new mount point does not automatically create the destination directory, hence the error message.
Runtime error message when trying to start up the jail upon folloing incorrect steps to set up a new Syncthing sahre.
Error: Traceback (most recent call last):
  File "/usr/local/lib/python3.6/site-packages/middlewared/main.py", line 166, in call_method
    result = await self.middleware.call_method(self, message)
  File "/usr/local/lib/python3.6/site-packages/middlewared/main.py", line 1093, in call_method
    return await self._call(message['method'], serviceobj, methodobj, params, app=app, io_thread=False)
  File "/usr/local/lib/python3.6/site-packages/middlewared/main.py", line 1037, in _call
    return await self._call_worker(name, *args)
  File "/usr/local/lib/python3.6/site-packages/middlewared/main.py", line 1058, in _call_worker
    return await self.run_in_proc(main_worker, name, args, job)
  File "/usr/local/lib/python3.6/site-packages/middlewared/main.py", line 990, in run_in_proc
    return await async_run_in_executor(loop, executor, method, *args, **kwargs)
  File "/usr/local/lib/python3.6/site-packages/middlewared/utils/asyncio_.py", line 41, in async_run_in_executor
    raise result
RuntimeError: mount_nullfs: /mnt/POOL/iocage/jails/Syncthing/root/media/Sync: Resource deadlock avoided
jail: /sbin/mount -t nullfs -o rw /mnt/POOL/Syncthing /mnt/POOL/iocage/jails/Syncthing/root/media/Sync: failed

Solution

It follows then that the correct way to add a new share to Syncthing in an iocage jail is to first create the directory inside the jail itself where the dataset will be mounted to. This is the crucial step. On my system, by default, this was somewhere in 
/mnt/POOL/iocage/jail/Syncthing/root/media/Sync/SHARE-NAME
however, this may vary for you. So log in via ssh to you FreeNAS server, cd to the Syncthing jail and mkdir a new directory. After this, the jail can be stopped and a new moint point added where the source is the storage pool and the destination is the previously created new directory. Starting the jail afterwards will work just fine and the rest can be done from the Syncthing GUI.

If the above issue is already present, remove the "falsely added" mount point in the FreeNAS GUI and start again.

Sunday, October 1, 2017

Windows Share Permissions Done Right in FreeNAS

The scenario is that you have a FreeNAS machine - for reference I am running FreeNAS-11.0-U2 - and you want to have a multi-user system where different users have different permissions to access shares over a local network. Here I will show a quick and basic setup of a new share and setting its permissions. Then I will explain two common issues that are encountered and how to resolve them:
  • Everybody can see and read the shares over the Windows network
  • I have set up the users, added them to the proper group, but they still cannot access a Dataset

To begin with, the basic steps for creating a new network share is as follows:
  1. Create and manage users and groups
  2. Create and share the Datasets

Create and Manage Users and Groups

It is probably easier to start with this. So for example we want to have 3 users, Alice, Bob and Charlie. They should all be granted access to some common shared directories and have restricted access to some other directories.
  1. Create a Group called "Shared". This group will be the owner of later directories (Datasets) accessible to all of the users.
    Creating a new group called Shared.
  2. Create the users Alice, Bob and Charlie and add them to the group Shared.
    Creating a new user and adding immediately to the Shared group
    Adding the new user Alice, at the same time assigning her to the Shared group.

Create and Share the Datasets

There are plenty of guides on this and it is not so complicated once you get the hang of it. For reference take a look at doc.freenas.org, forums.freenas.org or tekblog. Here just for the sake of introduction the basic idea.
  1. Create a new Dataset called "Common" as a Windows share.
    Creating a new Dataset called Common.
  2. Change the permissions of the newly created Dataset and set the Owner (user) as root and the Owner (group) the Shared group.
    Changing the permissions of the new Datatset.
  3. Share the newly create Dataset. This makes it available over the network.
    Creating a new Windows (SMB) share
    Creating a new SMB (Windows) sahre for the newly created Dataset
 At this point all 3 users have access to the Common share over the network, by default \\freenas.local\Common. This is the basic setup and it will work on freshly created datasets. If you have previosuly changed any permissions on parent Datasets the read the section below for explaining the issues.

General Errors and Solution 

A brief section explaining some (trivial) problems I encountered and found it hard to get an explanation.

Everybody can see and read the share over the network

By default when making Windows shares in FreeNAS the group "Everyone" is added to a share and hence all users who can log in can actually view the share. The solution is to attach the volume in a Windows amchine as the owner of the dataset, right-click the folder, go to permissions and remove the group "Everybody" from the access list. This prevents LAN users from seeing the sahres all together.
Checking user and group permissions for the main Dataset
By default, the group "Everyone" is added to FreeNAS Windows shares.

Permissions settings for the main Dataset
To deny access of local network users without explicit permissions to view the shared Datasets, remove the "Everyone" group from the permissions tab.
If you have sub-folders in the datase, you will get a prompt asking you if you want to change the permissions recursively, you can say yes.

I have set up the users, added them to the proper group, but they still cannot access a Dataset

This can happen if a parent Dataset is shared and some of its sub-datasets are also shared separately. The issue comes when the sub-dataset has to be shared with an user, but the parent dataset has to be restricted. It took me a while to figure out - as it is often not mentioned - but the parent dataset in FreeNAS has to have the same Owner (group) as the sub-dataset you want to share. Lets look at the following simple share setup as an example.
Storage Dataset with Music and Series sub-datasets.
Example share setup, where Storage Dataset has 2 sub-datatsets.


If I wanted to share just the Music sub-dataset with Alice, I would need to do the following,
  • Create a new group, e.g. called "Shared"
  • Add Alice to the group Shared
  • Make "Shared" the Owner (group) of the Music dataset
  • Make "Shared" the Owner (group) of the Storage parent Dataset (this is usually forgotten!)
  • To restrict Alice's access to the Series dataset, make sure that it is owned by another group in which Alice is not a member.

Run Storjshare in a FreeNAS Jail

Not really a Debian/Ubuntu thing as per say, but since recently I built a FreeNAS system, I though it would be useful to rent out an unused 2 TB disk. So here it goes, Storjshare daemon inside a FreeNAS-11.0-U2 jail.

I am assuming that you know what storjshare is, basic experience with its terminal (non-GUI) version and that you have hands-on experince with FreeNAS.

Update (2018 Jan 9):

I ran into a range of errors during an update. Here are my observations and the solutions I found.
  1. Installing via nvm did not work for me, instead I manually installed the dependencies,
    pkg install npm
    npm install -g npm3

    Currently this would install the following node and npm versions,
    node v9.3.0
    npm3 3.10.10
    npm 5.3.0

    Since npm install the latest version of node automatically, manual installation of node is not necessary.
  2. Updating storjshare after thisworks using,
    npm3 install storjshare-daemon --global --no-optional
    (Yes, that is npm3 and not npm. I seem to have run into an infinite number of troubles with that.)
  3. Permission errors with npm can be fixed by changing npm's default directory
  4. Currently running,
    storjshare --version
    daemon: 5.3.0, core: 8.5.0, protocol: 1.2.0
If any packages are reported missing when installing storjshare-daemon via npm3, remember to install them by,
npm3 install -g <package>
instead of,
npm install -g <package>

TL;DR (aka Advanced users) 

  1. Create jail and assign storage space
  2. In jail terminal
    pkg install npm git
  3. Then install npm3 with,
    npm install -g npm3
  4. Install storjsahre via npm,
    npm3 install storjshare-daemon --global --no-optional
  5. Start the daemon and connect a farmer node
    storjshare-daemon
    storjshare start --config yourconfig.jso
    n
Not clear enough? Read below.

Create a Jail and add some space

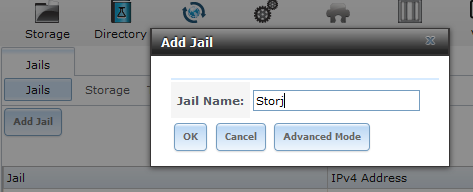
  1. Go to Jails/Add Jail. No fancy setting required, probably name it something useful like Storjshare
    Adding a new jail in FreeNAS
    Add a new jail "Storj" where the service will run.
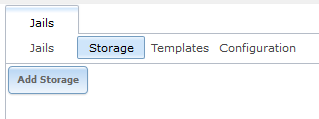
  2. Assign storage place to the jail. Go to Jail/Storage/Add Storage. Select the source, aka the drive or directory to store the future files and the destination. The destionation could be e.g. /mnt/Storjshare and you can ask to create the new directory.
Creating a new jail in the UI
Adding storage space to an existing jail.

Allocating storage space from a Dataset to the newly created jail
Assigning the source (drive space) of Drive1/Storjshare to the jail's /mnt/Storjshare mount point.

 The jail is ready and set, proceed to the next step.

Installing storjshare

Now I did not follow the standard instructions as installing node the described way did not seem to work. Instead I manually installed the required node version via pkg. We need the LTS version 6 of node and we can check for this. You can either log in via ssh to the jail or simply launch a terminal from the UI on the Jails tab.
UI snippet showing how to start a shell from the web browser
Conveniently launching a terminal from the UI.
Once the terminal is open, lets install the pre-requisites first, followed by storjshare.
  1. Search for availabel node versions via,
    pkg search node
    pkg search node output in the shell
    pkg search node returns a list of available packages, notice the node6-6.11.3-1.
  2. The node version we need is node6-6.11.3-1 as shown above. This can be installed with,
    pkg install node6-6.11.3-1
    Installing node6 LTS using pkg install
    Installing node6 with pkg.
  3. At the end you will be prompted to isntall npm3, so do,
    pkg install npm
    Installing npm via pkg install
    Installing npm3 after node6.
    Since npm3 can no longer be found directly through PKG, to install it do,
    npm install -g npm3
  4.  These should be completed so install the other required packages as well,
    pkg install git
  5.  Start installing storjshare as per the githug guide,
    npm3 install storjshare-daemon
    --global --no-optional
    A few warnings will be present, but for all functionality it will work.
Note: Above the --no-optional was added to the install command as a suggestion from github as the dtrace package fails to build on FreeBSD at the moment. Since the package is not necessary for storjshare, to avoid annoying - and non-relevant - error messages, this modeule can be ommited. When building without the additional --no-optional a similar error will be thrown, although storjshare would still run:
Error: Cannot find module './build/Release/DTraceProviderBindings'

Running storjshare

This is somewhat beyond the scope of the guide, however here is a quick guide on setting up a simple storjshare farming node.
  1. Create your config file with the help of storjsahre --help
    Usage: storjshare-create [options]

    generates a new share configuration

    Options:

    -h, --help                 output usage information
    --storj <addr>             specify the STORJ address (required)
    --key <privkey>            specify the private key
    --storage <path>           specify the storage path
    --size <maxsize>           specify share size (ex: 10GB, 1TB)
    --rpcport <port>           specify the rpc port number
    --rpcaddress <addr>        specify the rpc address
    --maxtunnels <tunnels>     specify the max tunnels
    --tunnelportmin <port>     specify min gateway port
    --tunnelportmax <port>     specify max gateway port
    --manualforwarding         do not use nat traversal strategies
    --logdir <path>            specify the log directory
    --noedit                   do not open generated config in editor
    -o, --outfile <writepath>  write config to path
    For example,
    storjsahre-create --key myPayoutAddress --storage /mnt/StorjShare --size 2TB --logdir /root/ -o settings.json 
  2. After the config file was created, start the daemon with,
    storjshare daemon
  3. Finally, start the farming node using the previos settings,
    storjshare start --config settings.json
     
storjshare status output from the FreeNAS jail
Storjshare inside a FreeNAS jail, runign without problems.

Note: Specifying a logfile can be necessary. During my tryouts I have encountered some trouble with the log directory not being accessible by the jail's user.

Happy farming!