
Not really a Debian/Ubuntu thing as per say, but since recently I built a FreeNAS system, I though it would be useful to rent out an unused 2 TB disk. So here it goes, Storjshare daemon inside a FreeNAS-11.0-U2 jail.
I am assuming that you know what storjshare is, basic experience with its terminal (non-GUI) version and that you have hands-on experince with FreeNAS.
Update (2018 Jan 9):
I ran into a range of errors during an update. Here are my observations and the solutions I found.- Installing via nvm did not work for me, instead I manually installed the dependencies,
pkg install npm
npm install -g npm3
Currently this would install the following node and npm versions,
node v9.3.0
npm3 3.10.10
npm 5.3.0
Since npm install the latest version of node automatically, manual installation of node is not necessary. - Updating storjshare after thisworks using,
npm3 install storjshare-daemon --global --no-optional
(Yes, that is npm3 and not npm. I seem to have run into an infinite number of troubles with that.) - Permission errors with npm can be fixed by changing npm's default directory
- Currently running,
storjshare --version
daemon: 5.3.0, core: 8.5.0, protocol: 1.2.0
npm3 install -g <package>
instead of,
npm install -g <package>
TL;DR (aka Advanced users)
- Create jail and assign storage space
- In jail terminal
pkg install npm git - Then install npm3 with,
npm install -g npm3 - Install storjsahre via npm,
npm3 install storjshare-daemon --global --no-optional - Start the daemon and connect a farmer node
storjshare-daemon
storjshare start --config yourconfig.json
Create a Jail and add some space
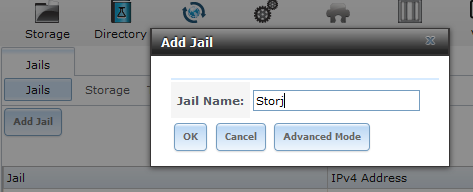
- Go to Jails/Add Jail. No fancy setting required, probably name it something useful like Storjshare

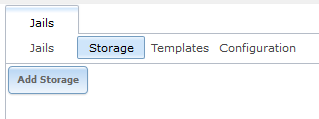
Add a new jail "Storj" where the service will run. - Assign storage place to the jail. Go to Jail/Storage/Add Storage. Select the source, aka the drive or directory to store the future files and the destination. The destionation could be e.g. /mnt/Storjshare and you can ask to create the new directory.
 |
| Adding storage space to an existing jail. |
 | |
| Assigning the source (drive space) of Drive1/Storjshare to the jail's /mnt/Storjshare mount point. |
The jail is ready and set, proceed to the next step.
Installing storjshare
Now I did not follow the standard instructions as installing node the described way did not seem to work. Instead I manually installed the required node version via pkg. We need the LTS version 6 of node and we can check for this. You can either log in via ssh to the jail or simply launch a terminal from the UI on the Jails tab.
 |
| Conveniently launching a terminal from the UI. |
Once the terminal is open, lets install the pre-requisites first, followed by storjshare.
- Search for availabel node versions via,
pkg search node
pkg search node returns a list of available packages, notice the node6-6.11.3-1. - The node version we need is node6-6.11.3-1 as shown above. This can be installed with,
pkg install node6-6.11.3-1
Installing node6 with pkg. - At the end you will be prompted to isntall npm3, so do,
pkg install npm
Since npm3 can no longer be found directly through PKG, to install it do,
Installing npm3 after node6.
npm install -g npm3
- These should be completed so install the other required packages as well,
pkg install git - Start installing storjshare as per the githug guide,
npm3 install storjshare-daemon --global --no-optional
A few warnings will be present, but for all functionality it will work.


Note: Above the --no-optional was added to the install command as a suggestion from github as the dtrace package fails to build on FreeBSD at the moment. Since the package is not necessary for storjshare, to avoid annoying - and non-relevant - error messages, this modeule can be ommited. When building without the additional --no-optional a similar error will be thrown, although storjshare would still run:
Error: Cannot find module './build/Release/DTraceProviderBindings'
Running storjshare
This is somewhat beyond the scope of the guide, however here is a quick guide on setting up a simple storjshare farming node.- Create your config file with the help of
storjsahre --help
For example,Usage: storjshare-create [options]
generates a new share configuration
Options:
-h, --help output usage information
--storj <addr> specify the STORJ address (required)
--key <privkey> specify the private key
--storage <path> specify the storage path
--size <maxsize> specify share size (ex: 10GB, 1TB)
--rpcport <port> specify the rpc port number
--rpcaddress <addr> specify the rpc address
--maxtunnels <tunnels> specify the max tunnels
--tunnelportmin <port> specify min gateway port
--tunnelportmax <port> specify max gateway port
--manualforwarding do not use nat traversal strategies
--logdir <path> specify the log directory
--noedit do not open generated config in editor
-o, --outfile <writepath> write config to path
storjsahre-create --key myPayoutAddress --storage /mnt/StorjShare --size 2TB --logdir /root/ -o settings.json - After the config file was created, start the daemon with,
storjshare daemon - Finally, start the farming node using the previos settings,
storjshare start --config settings.json
 |
| Storjshare inside a FreeNAS jail, runign without problems. |
Note: Specifying a logfile can be necessary. During my tryouts I have encountered some trouble with the log directory not being accessible by the jail's user.
Happy farming!
If you're looking to burn fat then you absolutely have to get on this totally brand new custom keto diet.
ReplyDeleteTo produce this keto diet, licensed nutritionists, fitness couches, and cooks have joined together to develop keto meal plans that are effective, painless, cost-efficient, and delightful.
From their grand opening in early 2019, 100's of people have already remodeled their figure and health with the benefits a professional keto diet can give.
Speaking of benefits; clicking this link, you'll discover 8 scientifically-certified ones provided by the keto diet.