Thursday, April 3, 2014

Heat Sinks on the Raspberry Pi


The Raspberry Pi is a credit-card sized computer that plugs into your TV and a keyboard. It is a capable little computer which can be used in electronics projects, and for many of the things that your desktop PC does, like spreadsheets, word-processing and games. It also plays high-definition video. We want to see it being used by kids all over the world to learn programming. [1]

This post will discuss the need and usefulness as well as short installation instructions of heat sinks for the Raspberry Pi. Information is related to the Raspberry Pi Model B (512 MB RAM)


Is it necessary?


The question often comes up, is it necessary to use some sort of cooling on the Pi or is it fine as it is?

From an engineering perspective it is most likely not necessary to use an additional heat sink. A product for sale should normally work "as is" without any major source of failure or a need from the consumer to do changes to the product. Maybe that is only my perspective in general, but the point has been made.

The ARM11 processor powering the Raspberry Pi Model B is used in a range of mobile devices that do not have any cooling, except for passive cooling heat sinks maybe. Forums and other sources say [2] that heat is not an issue with these chips until about 100 degrees Celsius (212 Fahrenheit). It is very unlikely that one would get to such temperatures under any sort of normal usage.

Why Use a Heat Sink then?


Thermal view of the Raspberry Pi Model B (Source)

It is a personal choice to use a heat sink on the Raspberry, but as mentioned above it is absolutely not necessary. So what might influence you to buying a heat sink for your Raspberry?
  • Hot environments and overclocking
  • The looks of the device and peace of mind, knowing it will not overheat
  • Continuous heavy load and overclocking
  • Because you want to do it

Normal Operating Conditions

During normal usage my Raspberry in its original case is operating in the range of 46-48 C, based on my own measurements. This is slightly less than the temperatures of 51-53 C measured by Thomas [4] for an enclosed idling Raspberry Pi. Possibly due to the fact that I am reading off the values via a software whereas he was using thermal imaging.

Either way, these values are well within the operating limit and shouldn't cause any issue any time soon. However, I would sleep better if I knew that there was some sort of extra heat removal method on my Raspberry when I'm not at home and this little thing is working at full load.

Overclocking

Overclocking is the process of increasing the clock rate of the Raspberry Pi's processor. By default it is running at 700 MHz, however even from the default firmware this can be increased to 800 MHz or even further to 1 GHz.

Overclocking increases the speed of the processor, however it also means a higher energy consumption and therefore more heat generated. The temperature of a processor has nothing to do with the performance of the processor (speed), but rather its lifetime. At higher temperatures a processor is more likely to fail compared to one operating at lower temperatures, refer to image below. 
Semiconductor lifetime with increasing junction temperature (source [3])

Hence it is of best interest to keep CPUs at as low temperatures as possible.

I am still running my Raspberry Pi at the original 700 MHz and do not plan to overclock any time soon. If I will need an increased performance I would look into it, but for now I do not see the point for my usage profile.

Which Heat Sink to Use and Where to Put It?

I went for Aluminium heat sinks (from eBay) which were exactly the right size and made for the Raspberry Pi. For easy application I chose the ones that have some thermal paste sticker on the back, so it is literally as easy as peeling off the back and aligning it properly on the chip.

Aluminium heat sinks ready to be glued onto the chip

Aluminium heat sinks applied to the Raspberry Pi

I would say position or aligning the heat sinks (which way the fins are facing) is barely going to affect the already small efffect they make. If you have an air flow over the Pi then from a heat transfer point of view it is more efficient to have the fins parallel to the air stream so that it moves between the fin and removes more heat. Nevertheless, do not worry about this as it will not make a significant difference, especially if you are using the Pi in a standard room condition without overclocking.

Be careful when position and dropping the glued heat sinks onto the board as they stick fast and removing-reapplying them may reduce the contact surface between the heat sink and the board. Apply pressure gently to make them stick nicely, but avoid damaging the board.

Conclusion

If you want to put some heat sinks on your Raspberry Pi because you are worried about it "burning out", then you probably do not need heat sinks. In some of the above mentioned use scenarios you can consider, but chances are it will not make much of a difference.

If you love tinkering with tech, want to learn a little about the RPi and are curious, then go ahead, It isn't much work nor does it cost a lot of money, but you will have a slightly more customized Raspberry Pi.

References

[1] - http://www.raspberrypi.org/faqs
[2] - http://blog.oscarliang.net/raspberry-pi-heat-sink-do-you-need-it/
[3] - http://www.interfacebus.com/Integrated-Circuit_Derating_Guide.html
[4] - http://www.tooms.dk/?page=http%3A//www.tooms.dk/Tblog/Showblog1.asp%3FY%3D2012%26M%3D9


Wednesday, April 2, 2014

Ubuntu One File Services Shutting Down!

Canonical has announced today shutting down the Ubuntu One cloud storage and music storage system. The company said that they cannot compete any more with other service providers giving away free 25-50 GB of storage. As a consequence further releases of Ubuntu, starting with 14.04 LTS, will not ship with the Ubuntu One file services.

However, as the blog post states
"The shutdown will not affect the Ubuntu One single sign on service, the Ubuntu One payment service, or the backend U1DB database service."

Important Dates to Keep in Mind

April 02 2014: It is no longer possible to buy additional storage or music files
June 01 2014: Services will be unavailable (User data still available for download)
July 31 2014: All files left in the cloud will be deleted


Please read the official blogpost here: http://blog.canonical.com/2014/04/02/shutting-down-ubuntu-one-file-services/ for more information about the details.

Make sure to backup all the data you have in Ubuntu One file storage!

Thursday, January 16, 2014

Raspberry Pi for Block Erupter Bitcoin Mining

Previously I have written about setting up Bitcoin mining with the Block Erupter in Ubuntu, however a more efficient way to mine can be to use of a Raspberry Pi to control the Block Erupter(s). The major benefit to this is the greatly reduced power consumption, provided by the Raspberry Pi compared to a desktop computer or a laptop.

Controlling the mining of a Block Erupter does not require huge amounts of system resources, so the Pi can also be used for other tasks at the same time (ssh tunnelling, small webserver and so on).

Initial Requirements and Expected Outcome

Hardware

  • Raspberry Pi (preferably model B)
  • Block Erupter (as used in this guide, but other miners should also work if connectable)
  • Powered USB hub
  • Small fan (cooling the miner, necessary for Block Erupter)

Software

  • Raspbian Wheezy (OS running on the Raspberry Pi)
  • screen
  • bfgminer 3.9 [1]

Expectation

  • Steady, reliable mining speed of 300-330 MH/s
  • Low HW errors, definitely under 1%, but better in the range of 0.4-0.6%
  • Continuous running without the need of reboot or maintenance of any sort
  • No "hungs" of the Raspberry Pi, mining and configuration to be done without physical access to the hardware after initial setu
  •  Remote access and configuration (reach the Raspberry Pi through ssh)

Installation

Installing bfgminer

I have installed the latest version (as of December 2013) of bfgminer 3.9.0. This will be the reference in this guide. If you choose to install another version, please change the commands accordingly.

  1.  ssh into the Raspberry Pi. You will need root privileges.

    ssh user@raspberrypi
  2. Installing dependencies

    sudo apt-get install build-essential autoconf automake libtool pkg-config libcurl4-gnutls-dev libjansson-dev uthash-dev libncursesw5-dev libudev-dev libusb-1.0-0-dev libevent-dev libmicrohttpd-dev hidapi libmicrohttpd-dev
  3.  Download bfgminer

    wget http://luke.dashjr.org/programs/bitcoin/files/bfgminer/3.9.0/bfgminer-3.9.0.zip
  4. Unzip

    unzip bfgminer-3.9.0.zip
  5. Cd to directory

    cd bfgminer-3.9.0
  6. Configure. Note that by default all miner configuaations are enabled, so no extra argumetns are required if building for Block Erupters. (If you would like to disable some miners because you will not be using them, check out the README file that comes with bfgminer)

    ./configure
  7. And finally make

    sudo make
Technically it is done and bfgminer can be run.Navigate to the directory and

sudo ./bfgminer -o pool:port -u usrname -p password -S erupter:all

Where "-S erupter:all"  is important as it tells bfgminer to search for all connected Block Erupters and use them for mining.

The problem of running bfgminer like this is that it is only running until you have the ssh tunnel open. Once you close it, bfgminer shuts down. Hence one would need to have a computer running 24/7 in order to keep the ssh tunnel open and contiue mining. To overcome this problem, screen will be used. [2]

Running bfgminer "as a service" with screen 

"Screen is a full-screen window manager that multiplexes a physical terminal between several processes." [3] Technically it allows to run a command in a virtual terminal window in the background, which allows running the miner in the background too without the need of a live ssh connection to the Raspberry pi.

Simply install screen with
sudo apt-get install screen

After that, running bfgminer with screen goes as the following.

Start Bfgminer
sudo screen -dmS miner ./bfgminer -o pool:port -u usrname -p password -S erupter:all

Note: that this assumes you are in the directory of bfgminer. If you want to make a general command append the route to before ./bfgminer.

This will start bfgminer in a new screen session, detached, so no output will be shown on the screen, you will be returned to the command line. Here is a short explanation what the parts of the above command do.

  • screen: start a new screen sessions
  • -dm : Start screen in "detached" mode. This creates a new session but doesn’t attach to it. This is useful for system startup scripts.
  • -S: Session name. When creating a new session, this option can be used to specify a meaningful name for the session. As above I named the session "miner", one may choose a more specific name as well.


Switch to the Screen Session 

sudo screen -dR miner

This will switch to the screen session where bfgminer is running. Here you can monitor the miner, accepted shares, stales and so on. Once you checked the miner is running OK, exit the screen session properly, without interrupting the miner!

Stop Screen Sessions

CTRL+A+D

This will properly detach the screen session, without interrupting the miner. Note if you exit the screen session with CTRL+C or exit the miner with "q", the mining will stop.

Observations

Choice of Miner

Originally I tried to make mining work with cgminer as that was more familiar to me and have been using it for quite a while. However, I have encountered several problems that I could not overcome.
I tried virtually every version of cgminer from 2.8 until the latest version to see which one works best, but none could perform reliably. Hardware errors (HW) were in the 10% range (!) which is far above the expected value. First I feared that I bought a somehow faulty chip and this was the reason for getting so many HW errors.
The miner was also somehow unstable and caused the Raspbery Pi to hung after about ~20h of running and required a maanual reboot. This was definitely not what I was looking for.

All this might not be caused by cgminer as I find it a great software for mining (works great on my computer), however I could not get it to work the way I wanted to with he raspberry Pi.

Bfgminer seems to have solved all these issues. The miner runs steady with a low ~0.50% HW error and it did not get hung so far after some extensive testing. Configuration is easy and it works pretty much "out of the box".

Pool

Some pools implement a high stratum difficulty which means that a 330MH/s miner will have a hard time submitting shares at all. I found this issue with quite a few pools. Triplemining on the other hand has a stratum difficulty of 1 and I am submitting a share about every 30-40 seconds.

Cooling and Hardware

As mentioned before in my setting up Bitcoin mining with the Block Erupter in Ubuntu article, the Block Erupter requires some cooling. Initially I wanted to add some small copper heat sinks, however this plan failed due to delayed delivery of the heat sinks. Hence I am only using a small fan directed over the Block Erupter and somewhat creating a slight air movement over the rasoberry Pi as well. See some pictures below. Not a masterpiece for sure, but runs fine and was a nice experiment!

Complete setup contained in a plastic basket

Block Erupter and the USB hub

Small USB fan (partially disassembled)
Bfgminer stats after running for 7 days


References


Monday, December 23, 2013

Bitcoin Mining with Block Erupter ASIC Miner in Ubuntu

With the new rise of Bitcoin prices yet again more and more people invest in buying coins and mining hardware. This drives the prices up, not only of the coins themselves but the hardware too.
There are still people who consider bitcoin as a learning process, hobby or simply don't have the money to invest thousands of Euros in mining hardware, but would like to mine efficiently. The solution can be the Block Erupter Bitcoin miner.


Block Erupter is a small USB ASIC miner (Application Specific Integrated Circuit) that consumes very low power and gives a reasonable hash rate in return (roughly half of that of a modern GPU, but at a fraction of the cost!). It is small, "plug and play" and makes a perfect gift or hobby investment for enthusiasts.
In Europe the price of these miners has climbed quite strong after the price of Bitcoins went high (800-1000€ range), a Block Erupter was selling for around 25€ at the beginning of November where it is selling at around 75€ at mid December.


Technical Specifications


Dimensions: 2x4 cm (WxH; without USB connector)
Connection: USB port
Power Usage: 2.5W (5V DC, 500-510mA)
Hash Rate: 300-336 MH/s
Price: Varies, cheapest new devices is ~50€ as of 2013 Dec 15 (ebay)
Additional: Green LED indicates the status (LED on=standby, LED blinking=share is found/hashing)

(Reference see [1])

Mining with cgminer


In this example I will describe how to mine using cgminer [2] software under Ubuntu 12.10. If your Ubuntu is newer, it is not a problem, the steps should also work on the newer system. 

The device is "plug and play" under Linux, it doesn't require any drivers to be installed (unlike in Windows) so it is pretty easy to set up. Individual problems (missing packages and such) may arise during installation, however these are rather easy to solve. If you are having problems, leave a comment and I will get back to you ASAP to find the problem and help you get going.
  1. Download the latest cgminer.tar version from: http://ck.kolivas.org/apps/cgminer/
  2. Open a terminal (CTRL+T) and navigate to your download folder, by default
    cd Downloads
  3. Untar the file
    tar -xjvf cgminer-x.x.x.tar.bz2
  4. Go into the newly created directory
    cd  cgminer-x.x.x.tar.bz2
  5. ./configure --enable-icarus
  6. If you got any errors at the end of configuration, check them and see what package(s) are you missing. Install them with sudo apt-get install <package-name> OR from the synaptic package manager (sudo synaptic from he terminal)
    After eliminating the errors run
    sudo make && sudo make install
  7. Copy the example configuration file into a new configuration file that contains your pool's details.
    cp example.conf yourconfig.conf
  8. Now edit the config file you just created. This will have lines in it with pool address, worker name and passwords. Fill these out and save them.
    gedit yourconfig.conf
  9. Then to run cgminer, but note that you have to be root in order for Ubuntu to recognize the USB miner, so
    sudo cgminer --config yourconfig.conf 
  10. Alternatively, if you do not want to use a config file you can also run cgminer with
    sudo cgminer -o pooladdress:port -u minername -p port
Block Erupter mining under my Ubuntu machine

Suggestions


Now the down side, the Block Erupter gets hot in normal operating conditions. And by hot I mean HOT. After about 5 minutes of testing it almost burned my finger when I touched it. Hence it is advised to invest into cooling to prolong the lifetime of the miner.


Additional:
  • Powered USB Hub (each Block Erupter requires ~0.5A)
  • Cooling fan
  • Heat sinks
  • OPTIONAL: Raspberry Pi to control the miner(s)

Powered USB Hub


Make sure it can supply enough power to the miners. Each miner takes 0.5A at 5V DC giving 2.5 Watts of power consumption (Power=Voltage*Current). Hence a 5 USB port hub should get at least 5*0.5A=2.5A of current in order to supply enough power if 5 miners are connected. Even better, it is advised to get one with a slightly higher rating, say 3A supply for 5 miners. On the other side if you need 2.5A and you only have 2, it won't work.

Cooling


Passive Cooling
Generally preferred in power electronics as there are no components to fail (in the cooling system). Efficiency is lower than that of forced air or liquid cooling, but the miner should be built so that it can function out of the box as well. Although I doubt that the Block Erupter would live too long if running extensively without some cooling measures.

Forced Air Cooling
Installing a small fan to provide airflow over the miner is a common technique. USB fans are the easiest to use as they are "plug and play", however it is going to take 1 of the USB ports
A12V DC CPU fan can also do the job, and most likely provide better cooling performance as well. However, a CPU fan requires a separate 12V DC power supply. While practically it can run off from 5V DC, the airflow will be severely limited.


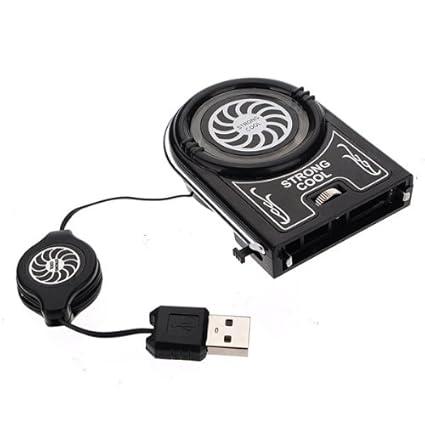
I have seen many people using a fan such as this one, I assume it does a nice job.


Personal Experience


I have decided to cover the top of my Block Erupter in heat sinks to increase heat transfer to the environment. I have ordered some small Copper heat sinks from eBay with some thermal paste sticker on the back for easy application. I will mount these on the front side of my miner and then direct a small USB fan on it as well. I hope to keep the temperature of the miner as low as possible using this method.


USB fan (source:Amazon.com)


Update: Unfortunately, my heat sinks didn't arrive from eBay so I have decided to give up this plan. Instead I have found a small USB fan I bought previously that I can use here.  (see image on the left)
The fan  produces quite a strong air flow so I have decided to have  a go at it.


I have removed the outer case so I am left with the inside only that allows me to better direct the airflow over the Block Erupter.
It is a little noisy, but I am running it in the basement so it doesn't bother anyone.
This fan keeps the ASIC miner at room temperature without any problem, it doesn't heat anywhere as much as without the fan.

As a footnote I noticed that when operating the miner from a USB port on my laptop it heats up  much faster than when powering it via an USB hub. Also I noticed that (at least when plugged into my laptop) the miner heats up even when I am not mining with it, LED lighting.


Conclusion


Is it worth to buy a Bloc Erupter? It depends why you want to buy it. It could be considered more of a hobby rather than a serious income. With the ~300 MH/s one will not get rich, it is just enough to make up for the price of electricity and the initial investment. 

Unfortunately I do not have any data on the lifetime of the small miners, nor could I find anything related online. So I cannot clearly state whether they are worth their money (on a purely economical basis) or not. I will record my progress of using my Block Erupter and update this article depending on my findings. One thing is for sure, it is a fun thing to have around, showing your support and liking of the Bitcoin community and possibly spreading the word about Bitcoins to your friends.

Sunday, November 17, 2013

Ubuntu Update Error - Disk Is Full ?

My last Software Update didn't go well and something got broken. Afterwards I had a nice little red mark on the top bar on my Desktop saying that the Update was unsuccessful. No matter how many times I tried to re-run the upgrade it didn't work.

sudo apt-get update

Returned that there are is a broken package and I should run apt-get -f install to repair broken packages.

Trying the command as per suggested in the terminal window gave the following result:

nargren@T808:~$ sudo apt-get -f install
Reading package lists... Done
Building dependency tree       
Reading state information... Done
Correcting dependencies... Done
The following extra packages will be installed:
  linux-headers-3.2.0-56
The following NEW packages will be installed
  linux-headers-3.2.0-56
0 upgraded, 1 newly installed, 0 to remove and 14 not upgraded.
3 not fully installed or removed.
Need to get 0 B/11.7 MB of archives.
After this operation, 56.3 MB of additional disk space will be used.
Do you want to continue [Y/n]? y
(Reading database ... 803914 files and directories currently installed.)
Unpacking linux-headers-3.2.0-56 (from .../linux-headers-3.2.0-56_3.2.0-56.86_all.deb) ...
dpkg: error processing /var/cache/apt/archives/linux-headers-3.2.0-56_3.2.0-56.86_all.deb (--unpack):
 unable to create `/usr/src/linux-headers-3.2.0-56/arch/parisc/include/asm/superio.h.dpkg-new' (while processing `./usr/src/linux-headers-3.2.0-56/arch/parisc/include/asm/superio.h'): No space left on device
No apport report written because the error message indicates a disk full error
dpkg-deb: error: subprocess paste was killed by signal (Broken pipe)
Errors were encountered while processing:
 /var/cache/apt/archives/linux-headers-3.2.0-56_3.2.0-56.86_all.deb
E: Sub-process /usr/bin/dpkg returned an error code (1)

Saying that there is no space left on the device made me check my disk partitions.

nargren@T808:~$ df -h
Filesystem      Size  Used Avail Use% Mounted on
/dev/sda2        14G   11G  2.3G  84% /
udev            489M  4.0K  489M   1% /dev
tmpfs           199M  980K  198M   1% /run
none            5.0M     0  5.0M   0% /run/lock
none            497M  224K  496M   1% /run/shm
/dev/sda3        58G   30G   25G  55% /home

It showed that there is plenty of space. Looking for further advice on my issue I stumbled upon this post on superb.com. Although the issue was not much related to my problem, I could use the techniques described there.

Using the command

for i in /*; do echo $i; find $i | wc -l; done

What this does is it counts the number of files in the root (/*) directory. Once it finishes (can take some time) run it again on the directory that had most f the files in it. To do so simply change the "/*" part of the code. So for example if your /usr directory contained the most of the files, then it would be 

for i in /usr/*; do echo $i; find $i | wc -l; done

(Please not that this command can take a while to run, be patient)

I found that for me the /usr directory was overcrowded with files, 786000 to be exact. Most of this was occupied by the /usr/src sub-directory. After some more searching and research, turns out this holds the different kernel header files.

Since it is not advised to manually remove these files, I checked quickly what kernel I'm using, just to know what to leave intact.

nargren@T808:~$ uname -a
Linux T808 3.2.0-56-generic-pae #86-Ubuntu SMP Wed Oct 23 17:51:27 UTC 2013 i686 i686 i386 GNU/Linux

Afterwards I opened synaptic manager and marked all kernel files up until 3.2.0-49 for removal (left the last few, just to be on the safe side).

You can open the synaptic manager either from the Dash (Windows button) or with
sudo synaptic


After this, the error message was gone, my kernel wasn't damaged and had been updated successfully.

Sunday, November 3, 2013

Creating Bookmarks in Ubuntu File Manager (Nauitilus)

It is very handy to have some extra directories added to the sidebar in the Ubuntu file manager (Nautilus) to allow quick navigation, especially if one has rather complex file structures on your computer.

Adding bookmark

  1. First, open the file manager
  2. Select the directory you would like to add to the sidebar and enter that directory (!)
  3. Once inside the directory, go to the Ubuntu title bar and select Bookmarks/Add Bookmark (Note that if you are not inside the directory, it will not work!)


  4. The directory will appear in the sidebar of the file manager, granting fast access from now on to the files within that directory.

    Remove Bookmark


    If you want to remove the bookmark from the sidebar right-click it and select remove.

    Saturday, August 10, 2013

    Configuring Mobile Broadband in Ubuntu

    Mobile internet dongles are used in places where stable, wired internet connection is not present due to a range of reasons or it isn't required on a daily basis. Examples are weekend houses, vacations, field trips and many more.

    Internet dongles are usually USB devices with a SIM card in them that use the mobile network to connect to the internet. Based on the type of the modem and the available telecommunication network (speed, signal strength etc.), the speed of the internet access can vary on a very broad range from a few kb/s up to tens of Mb/s. These USB dongles are usually pre-loaded with software that prompts for installation when plugged in to a Windows machine. But what happens in Ubuntu? It's much simpler. Most of the settings required for setting up a mobile broadband are built into the operating system, hence there is no need to download or install any new software.

    The below guide will be based on my experiences in Hungary (EU) with T-mobile. However, Ubuntu is very versatile and contains appropriate settings for almost all countries, hence setting up your own mobile broadband will be very similar.

    1. Put the SIM card into the USB modem and plug it into your computer. If the SIM is PIN code protected, you will be prompted to unlock the SIM card by typing in the PIN.


    2. Go to Networking/Edit Connections/Mobile Broadband and click "Add"


    3. This will prompt you to input a range of information, specific to your provider, country and more. Completing the steps is simple and requires no deep knowledge about computing or telecommunications. The below screenshots are from my setup process.
      (Note: Mobile Broadband device is automatically recognized)


    4. Finally, clicking on the "Apply" button will add the new mobile broadband connection to your Network Connections.

    5. To connect, click on your network icon and select the newly created entry. You should get a pop-up message saying that you are connected. to the internet.

    Depending on you country and provider you are using the steps shown in point 3. can differ, but everything should be self explanatory and straightforward.