Showing posts with label bitcoin mining. Show all posts

Thursday, January 16, 2014

Raspberry Pi for Block Erupter Bitcoin Mining

Previously I have written about setting up Bitcoin mining with the Block Erupter in Ubuntu, however a more efficient way to mine can be to use of a Raspberry Pi to control the Block Erupter(s). The major benefit to this is the greatly reduced power consumption, provided by the Raspberry Pi compared to a desktop computer or a laptop.

Controlling the mining of a Block Erupter does not require huge amounts of system resources, so the Pi can also be used for other tasks at the same time (ssh tunnelling, small webserver and so on).

Initial Requirements and Expected Outcome

Hardware

  • Raspberry Pi (preferably model B)
  • Block Erupter (as used in this guide, but other miners should also work if connectable)
  • Powered USB hub
  • Small fan (cooling the miner, necessary for Block Erupter)

Software

  • Raspbian Wheezy (OS running on the Raspberry Pi)
  • screen
  • bfgminer 3.9 [1]

Expectation

  • Steady, reliable mining speed of 300-330 MH/s
  • Low HW errors, definitely under 1%, but better in the range of 0.4-0.6%
  • Continuous running without the need of reboot or maintenance of any sort
  • No "hungs" of the Raspberry Pi, mining and configuration to be done without physical access to the hardware after initial setu
  •  Remote access and configuration (reach the Raspberry Pi through ssh)

Installation

Installing bfgminer

I have installed the latest version (as of December 2013) of bfgminer 3.9.0. This will be the reference in this guide. If you choose to install another version, please change the commands accordingly.

  1.  ssh into the Raspberry Pi. You will need root privileges.

    ssh user@raspberrypi
  2. Installing dependencies

    sudo apt-get install build-essential autoconf automake libtool pkg-config libcurl4-gnutls-dev libjansson-dev uthash-dev libncursesw5-dev libudev-dev libusb-1.0-0-dev libevent-dev libmicrohttpd-dev hidapi libmicrohttpd-dev
  3.  Download bfgminer

    wget http://luke.dashjr.org/programs/bitcoin/files/bfgminer/3.9.0/bfgminer-3.9.0.zip
  4. Unzip

    unzip bfgminer-3.9.0.zip
  5. Cd to directory

    cd bfgminer-3.9.0
  6. Configure. Note that by default all miner configuaations are enabled, so no extra argumetns are required if building for Block Erupters. (If you would like to disable some miners because you will not be using them, check out the README file that comes with bfgminer)

    ./configure
  7. And finally make

    sudo make
Technically it is done and bfgminer can be run.Navigate to the directory and

sudo ./bfgminer -o pool:port -u usrname -p password -S erupter:all

Where "-S erupter:all"  is important as it tells bfgminer to search for all connected Block Erupters and use them for mining.

The problem of running bfgminer like this is that it is only running until you have the ssh tunnel open. Once you close it, bfgminer shuts down. Hence one would need to have a computer running 24/7 in order to keep the ssh tunnel open and contiue mining. To overcome this problem, screen will be used. [2]

Running bfgminer "as a service" with screen 

"Screen is a full-screen window manager that multiplexes a physical terminal between several processes." [3] Technically it allows to run a command in a virtual terminal window in the background, which allows running the miner in the background too without the need of a live ssh connection to the Raspberry pi.

Simply install screen with
sudo apt-get install screen

After that, running bfgminer with screen goes as the following.

Start Bfgminer
sudo screen -dmS miner ./bfgminer -o pool:port -u usrname -p password -S erupter:all

Note: that this assumes you are in the directory of bfgminer. If you want to make a general command append the route to before ./bfgminer.

This will start bfgminer in a new screen session, detached, so no output will be shown on the screen, you will be returned to the command line. Here is a short explanation what the parts of the above command do.

  • screen: start a new screen sessions
  • -dm : Start screen in "detached" mode. This creates a new session but doesn’t attach to it. This is useful for system startup scripts.
  • -S: Session name. When creating a new session, this option can be used to specify a meaningful name for the session. As above I named the session "miner", one may choose a more specific name as well.


Switch to the Screen Session 

sudo screen -dR miner

This will switch to the screen session where bfgminer is running. Here you can monitor the miner, accepted shares, stales and so on. Once you checked the miner is running OK, exit the screen session properly, without interrupting the miner!

Stop Screen Sessions

CTRL+A+D

This will properly detach the screen session, without interrupting the miner. Note if you exit the screen session with CTRL+C or exit the miner with "q", the mining will stop.

Observations

Choice of Miner

Originally I tried to make mining work with cgminer as that was more familiar to me and have been using it for quite a while. However, I have encountered several problems that I could not overcome.
I tried virtually every version of cgminer from 2.8 until the latest version to see which one works best, but none could perform reliably. Hardware errors (HW) were in the 10% range (!) which is far above the expected value. First I feared that I bought a somehow faulty chip and this was the reason for getting so many HW errors.
The miner was also somehow unstable and caused the Raspbery Pi to hung after about ~20h of running and required a maanual reboot. This was definitely not what I was looking for.

All this might not be caused by cgminer as I find it a great software for mining (works great on my computer), however I could not get it to work the way I wanted to with he raspberry Pi.

Bfgminer seems to have solved all these issues. The miner runs steady with a low ~0.50% HW error and it did not get hung so far after some extensive testing. Configuration is easy and it works pretty much "out of the box".

Pool

Some pools implement a high stratum difficulty which means that a 330MH/s miner will have a hard time submitting shares at all. I found this issue with quite a few pools. Triplemining on the other hand has a stratum difficulty of 1 and I am submitting a share about every 30-40 seconds.

Cooling and Hardware

As mentioned before in my setting up Bitcoin mining with the Block Erupter in Ubuntu article, the Block Erupter requires some cooling. Initially I wanted to add some small copper heat sinks, however this plan failed due to delayed delivery of the heat sinks. Hence I am only using a small fan directed over the Block Erupter and somewhat creating a slight air movement over the rasoberry Pi as well. See some pictures below. Not a masterpiece for sure, but runs fine and was a nice experiment!

Complete setup contained in a plastic basket

Block Erupter and the USB hub

Small USB fan (partially disassembled)
Bfgminer stats after running for 7 days


References


Monday, December 23, 2013

Bitcoin Mining with Block Erupter ASIC Miner in Ubuntu

With the new rise of Bitcoin prices yet again more and more people invest in buying coins and mining hardware. This drives the prices up, not only of the coins themselves but the hardware too.
There are still people who consider bitcoin as a learning process, hobby or simply don't have the money to invest thousands of Euros in mining hardware, but would like to mine efficiently. The solution can be the Block Erupter Bitcoin miner.


Block Erupter is a small USB ASIC miner (Application Specific Integrated Circuit) that consumes very low power and gives a reasonable hash rate in return (roughly half of that of a modern GPU, but at a fraction of the cost!). It is small, "plug and play" and makes a perfect gift or hobby investment for enthusiasts.
In Europe the price of these miners has climbed quite strong after the price of Bitcoins went high (800-1000€ range), a Block Erupter was selling for around 25€ at the beginning of November where it is selling at around 75€ at mid December.


Technical Specifications


Dimensions: 2x4 cm (WxH; without USB connector)
Connection: USB port
Power Usage: 2.5W (5V DC, 500-510mA)
Hash Rate: 300-336 MH/s
Price: Varies, cheapest new devices is ~50€ as of 2013 Dec 15 (ebay)
Additional: Green LED indicates the status (LED on=standby, LED blinking=share is found/hashing)

(Reference see [1])

Mining with cgminer


In this example I will describe how to mine using cgminer [2] software under Ubuntu 12.10. If your Ubuntu is newer, it is not a problem, the steps should also work on the newer system. 

The device is "plug and play" under Linux, it doesn't require any drivers to be installed (unlike in Windows) so it is pretty easy to set up. Individual problems (missing packages and such) may arise during installation, however these are rather easy to solve. If you are having problems, leave a comment and I will get back to you ASAP to find the problem and help you get going.
  1. Download the latest cgminer.tar version from: http://ck.kolivas.org/apps/cgminer/
  2. Open a terminal (CTRL+T) and navigate to your download folder, by default
    cd Downloads
  3. Untar the file
    tar -xjvf cgminer-x.x.x.tar.bz2
  4. Go into the newly created directory
    cd  cgminer-x.x.x.tar.bz2
  5. ./configure --enable-icarus
  6. If you got any errors at the end of configuration, check them and see what package(s) are you missing. Install them with sudo apt-get install <package-name> OR from the synaptic package manager (sudo synaptic from he terminal)
    After eliminating the errors run
    sudo make && sudo make install
  7. Copy the example configuration file into a new configuration file that contains your pool's details.
    cp example.conf yourconfig.conf
  8. Now edit the config file you just created. This will have lines in it with pool address, worker name and passwords. Fill these out and save them.
    gedit yourconfig.conf
  9. Then to run cgminer, but note that you have to be root in order for Ubuntu to recognize the USB miner, so
    sudo cgminer --config yourconfig.conf 
  10. Alternatively, if you do not want to use a config file you can also run cgminer with
    sudo cgminer -o pooladdress:port -u minername -p port
Block Erupter mining under my Ubuntu machine

Suggestions


Now the down side, the Block Erupter gets hot in normal operating conditions. And by hot I mean HOT. After about 5 minutes of testing it almost burned my finger when I touched it. Hence it is advised to invest into cooling to prolong the lifetime of the miner.


Additional:
  • Powered USB Hub (each Block Erupter requires ~0.5A)
  • Cooling fan
  • Heat sinks
  • OPTIONAL: Raspberry Pi to control the miner(s)

Powered USB Hub


Make sure it can supply enough power to the miners. Each miner takes 0.5A at 5V DC giving 2.5 Watts of power consumption (Power=Voltage*Current). Hence a 5 USB port hub should get at least 5*0.5A=2.5A of current in order to supply enough power if 5 miners are connected. Even better, it is advised to get one with a slightly higher rating, say 3A supply for 5 miners. On the other side if you need 2.5A and you only have 2, it won't work.

Cooling


Passive Cooling
Generally preferred in power electronics as there are no components to fail (in the cooling system). Efficiency is lower than that of forced air or liquid cooling, but the miner should be built so that it can function out of the box as well. Although I doubt that the Block Erupter would live too long if running extensively without some cooling measures.

Forced Air Cooling
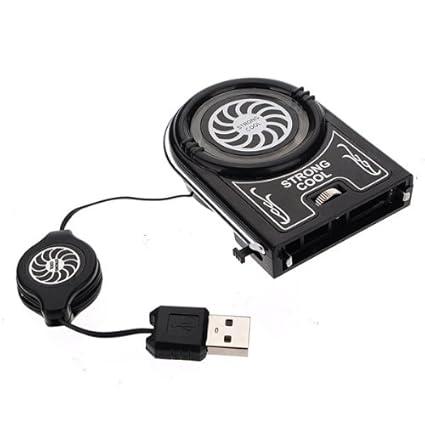
Installing a small fan to provide airflow over the miner is a common technique. USB fans are the easiest to use as they are "plug and play", however it is going to take 1 of the USB ports
A12V DC CPU fan can also do the job, and most likely provide better cooling performance as well. However, a CPU fan requires a separate 12V DC power supply. While practically it can run off from 5V DC, the airflow will be severely limited.


I have seen many people using a fan such as this one, I assume it does a nice job.


Personal Experience


I have decided to cover the top of my Block Erupter in heat sinks to increase heat transfer to the environment. I have ordered some small Copper heat sinks from eBay with some thermal paste sticker on the back for easy application. I will mount these on the front side of my miner and then direct a small USB fan on it as well. I hope to keep the temperature of the miner as low as possible using this method.


USB fan (source:Amazon.com)


Update: Unfortunately, my heat sinks didn't arrive from eBay so I have decided to give up this plan. Instead I have found a small USB fan I bought previously that I can use here.  (see image on the left)
The fan  produces quite a strong air flow so I have decided to have  a go at it.


I have removed the outer case so I am left with the inside only that allows me to better direct the airflow over the Block Erupter.
It is a little noisy, but I am running it in the basement so it doesn't bother anyone.
This fan keeps the ASIC miner at room temperature without any problem, it doesn't heat anywhere as much as without the fan.

As a footnote I noticed that when operating the miner from a USB port on my laptop it heats up  much faster than when powering it via an USB hub. Also I noticed that (at least when plugged into my laptop) the miner heats up even when I am not mining with it, LED lighting.


Conclusion


Is it worth to buy a Bloc Erupter? It depends why you want to buy it. It could be considered more of a hobby rather than a serious income. With the ~300 MH/s one will not get rich, it is just enough to make up for the price of electricity and the initial investment. 

Unfortunately I do not have any data on the lifetime of the small miners, nor could I find anything related online. So I cannot clearly state whether they are worth their money (on a purely economical basis) or not. I will record my progress of using my Block Erupter and update this article depending on my findings. One thing is for sure, it is a fun thing to have around, showing your support and liking of the Bitcoin community and possibly spreading the word about Bitcoins to your friends.