Sunday, February 14, 2016

ownCloud 8.1 APCu Memcache error

Yet another error I encountered while tweaking my ownCloud installation on my VPS at time4vps.eu. I was trying to enable the APCu memory caching to improve performance on my ownCloud 8.1 running with php 5.5.9 on an Ubuntu 14.04 server. 

Problem

I was following the guide and instructions found under doc.owncloud.org, however I quickly encountered a problem. Upon installing php5-apcu with
sudo apt-get install php5-apcu
and enabling it as per the guide, I was greeted with a white screen when trying to log in to owncloud. No error messages, it seemed the server just didn't load. No entries in logs under /var/log/. Interesting.

Solution

It took me a while to figure out what happened, finally I stumbled upon this github issue 14386.

Basically it turns out that in Ubuntu 14.04 if you install php5-apcu with apt-get install you will get APCu version 4.0.2 and the required version for ownCloud is 4.0.6 at least. Hence you need to remove the one installed form the repository and install a later version manually.

To check if this is indeed your issue do,
sudo dpkg -s php5-apcu
This should return the currently installed php5-apcu version. If this is older than 4.0.6 then continue reading.
  1. Remove the old APCu version (if installed via apt-get) with
    sudo apt-get remove php5-apcu
  2. Go to http://mirrors.kernel.org/ubuntu/pool/universe/p/php-apcu/ and copy the link to a version 4.0.6 at least which corresponds with your system's architecture.
  3. cd /tmp/
  4. sudo wget http://mirrors.kernel.org/ubuntu/pool/universe/p/php-apcu/php5-apcu_4.0.7-1build1~ubuntu14.04.1_amd64.deb
    (since my system is amd64 architecture)
  5. Install manually with dpkg
    sudo dpkg -i php5-apcu_4.0.7-1build1~ubuntu14.04.1_amd64.deb
  6. Remove downloaded file
    sudo rm php5-apcu_4.0.7-1build1~ubuntu14.04.1_amd64.deb
  7. Restart your apache2 server
    sudo /etc/init.d/apache2 restart
Note: Make sure you download the correct .deb file, i.e. amd64 or i386.
You can check what kind of system you have with uname -a.

Additional to ownCloud Caching Guide

In addition to the official doc.ownCloud.org guide you might have to adjust some settings in your /etc/php5/cli/php.ini if your installation is still not working. First check if apc.enable is "On" in your php.

Check,
php -i
And look for
apc.enable_cli => On => On
apc.enabled => On => On
If any of them is Off then this is your problem. Edit your php.ini with,
sudo nano /etc/php5/cli/php.ini
and copy the following into the file,
;;;;;;;;;;;;;;;;;;
;Memory chacing  ;
;;;;;;;;;;;;;;;;;;

;Added manually to enable memory chancing for ownCloud
apc.enable_cli=1
Press CTRL+O for saving and CTRL+X for exiting.

Restart apache with
sudo /etc/init.d/apache2 restart
It should work now. If not, you can leave me a message and I will do my best to get back to you or you can also join the IRC channel at #owncloud for some help.

Saturday, February 13, 2016

ownCloud "Server Not Installed" Error on Android Client

I have a server from the guys at time4vps.eu where I am running - among other things - an ownCloud instance. It was basically just a learning exercise to get it up and running, maybe invite a few friends if interested. Then I started also looking at certificates from letsencrypt.org and set up some sub-domains for my server.

Issue

The point where I ran into an issue was after I set up my sub-domains and the required encryption certificates. For some reason the browser login would work, but on my Android device I got an error from various apps saying,
"Server not Installed!"
This was weird, because desktop clients were syncing with absolutely no problem.

Solution

I was clueless for a long time and honestly demotivated to fix this, because I wasn't using it so often. Nevertheless, it was bothering me and whenever I logged into my server I remembered that something is broken and needed to be fixed.

I have spent hours trying to troubleshoot, unfortunately the error logs
/var/log/apache2/error.log
/var/log/owncloud.log
were empty or contained nothing related to the issue.

Finally after some IRC help and searching I stumbled upon the solution at forums.owncloud.org,

In /var/www/owncloud/config/config.php I had an entry
'installed' => 'true',
this had to be replaced by
'installed' => '1',
I have no clue as to why or how this error occurs, however possible there are some issues with the installation. Nevertheless, after changing this entry and restarting my apache the Android client worked right away.

Note: Depending on your installation of owncloud config.php might be elsewhere, e.g. /var/www/config/config.php if you installed it to the "root" web directory.
Editing the file is done by sudo nano /path/to/owncloud/config/config.php

I am troubleshooting further to find the true source of the error, but one issue has been fended off.

Wednesday, January 6, 2016

Bridged OpenWRT Access Point through PPtP

This will be a guide on how to set up a wireless access point that will forward traffic to a host/primary router (this is referred to as bridged AP) through a PPtP connection. The new AP will be created using a TP-LINK MR3020. All traffic from the second router shall go through the PPtP tunnel, while traffic coming from clients connected to the host router shall remain unaffected.

Contents
  • Project Description and Aims
  • Flashing OpenWRT on the MR3020
  • Configuration over LuCi
  • Configuration over SSH (including complete config files)
  • Check Packet Route
  • Troubleshooting

Project Description and Aims


TP-LINK MR


Given is a home router with the address 192.168.1.1 that provides internet access and acts as DHCP server on the local network. The task is to set up a secondary router, a TP-LINK MR3020 (Amazon.com) with the local IP address 192.168.1.2, as a wireless access point (AP) that will bridge the connection over to the main router over the LAN port. Furthermore, all traffic from the secondary router has to go through a PPtP tunnel.
PrivateInternetAccess VPNIf you need a provider that offers PPtP servers, I can recommend Privateinternetaccess where you will get a great VPN provider with PPtP service included. Perfect for both your everyday VPN needs as well as the given scenario.

I will assume a stock OpenWRT Chaos Calmer 15.05 on the MR3020, cleanly flashed without any modifications. Configuration is possible via ssh or over LuCi, both of which will be shown below. In older and potentially newer versions the LuCi UI may look differently.

Illustration shown "normal" internet traffic and the sought PPtP traffic
Illustration of the sought network setup. The blue line illustrates "normal" internet traffic originating from the host router whereas the orange line shows PPtP tunnelled traffic coming from the OpenWRT router and clients connected to it. [picture source]
Host (or primary) router
WiFi Network ==> Internet

Router 2
WiFi Network ==> PPtP enter  ==> LAN interface ==> Host (primary) router ==> Internet (tunnel transmit) ==> PPtP (server) exit ==> Internet

Flashing OpenWRT on the MR3020

This is covered in detail on e.g. OpenWRT wiki MR3020 page, hence I will not go through this.

Once OpenWRT is installed on your router, connect to it via an ethernet cable. The router should handle DHCP, meaning your ethernet port should get an IP address automatically, however if you still have your IP configured to static from flashing the router, that will work too.

Configuration over LuCi

LuCi is technically the UI overlay of OpenWRT that can be reached via 192.168.1.1 by default on a new installation and allows easy configuration via a visual interface. Since the MR3020 has only a single LAN port, the installation is slightly different that it would be with other routers. Essentially the procedure is the following,

  1. Make an initial connection to the router via an ethernet cable
  2. Adjust the LAN interface such that it will have access to the internet through the host router
  3. Set up WiFi network
  4. Disconnect your computer from the router and connect it to the primary router
  5. Connect to the OpenWRT router via WiFi
  6. Install ppp-mod-pptp package (This provides PPtP support, which is not installed by default)
  7. Add vpn (PPtP) interface
  8. Edit again the LAN interface to bridge all 3 networks
  9. Set up forwarding and firewall rules
  10. Reboot, if necessary.

Step 1.

In your web browser navigate to 192.168.1.1 (by default) and log in using the default credentials,
Username: root
Password: admin
OpenWRT Authorization
OpenWRT LuCi login page by default under 192.168.1.1 in your web browser.

Step 2.

Go to Network/Interfaces and click Edit for the LAN interface. This should be the only one available with the MR3020. Fill it out as shown below, according to the previously discussed network specifications.
Primary router (gateway): 192.168.1.1
OpenWRT (secondary router): 192.168.1.2
IPv4 netmask: 255.255.255.0
Use custom DNS servers: 192.168.1.1

LAN interface general setup for the given scenario.
LAN interface General setup using a primary router with the address 192.168.1.1 and the OpenWRT router as 192.168.1.2.

Step 3.

Go to Network/WiFi and click Edit. This section is self-explanatory and the configuration settings have no effect on the working of the bridged AP & PPtP. The only important thing here is to assign the WiFi interface to the LAN zone at the bottom of the page, as shown below.
WiFi Interface, added to LAN zone.
WiFi interface configuration. Make sure it is added to the LAN zone.

In the Advanced tab you can set the country where you are, which will impact on what WiFi channels you are allowed to use due to local regulations. Another thing that can be set is a Distance Optimization, which will help you adjust the signal strength based on the furthest device.

Step 4.

Save the settings and connect your OpenWRT router via an ethernet cable to one of the LAN ports (not WAN) of your primary router. Disconnect power if you have to, after saving the settings should remain stored.

Step 5.

Connect to your newly created WiFi network and in your browser navigate to 192.168.1.2 where you can log in.

Step 6.

Go to System/Software and click "Update". Then make a search for "pptp" and from the results install the package called ppp-mod-pptp. Refer to the picture below. (Funnily, when searching directly for ppp-mod-pptp I received no search results...)
Available packages containing pptp
Install the ppp-mod-pptp package from the results list.

Step 7.

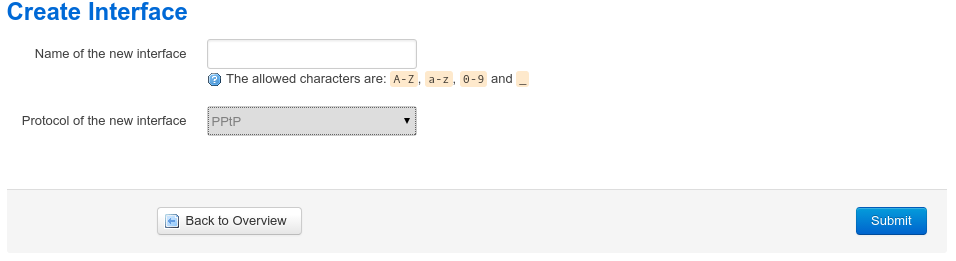
Go to Network/Interfaces and Add New interface for the vpn with protocol PPtP then click "Edit".
Create Interface. Name it e.g. vpn and select PPtP protocol.
While editing, fill out the fields,

VPN server (IP address or domain name)
Username
Password

You should obtain this information from your service provider.


PPtP settings
PPtP setting when adding the new VPN interface.
When done, click save.

Step 8.

Since a new interface was just added, the LAN interface has to be edited again to bridge 3 interfaces in total (so far it is bridging only LAN and the WiFi). Go to Network/Interfaces and edit the LAN interface. Navigate to the Physical settings tab and make sure to bridge all 3 networks available: eth0, gretap0 and the WiFi interface. The end result should look similar to the following.

LAN physical interface configuration tab common settings.
LAN interfaces Physical settings tab. All 3 interfaces, Ethernet, Wireless and PPtP (gre0 or gretap0) must be ticket at the bridge.

Step 9.

Navigate to Network/Firewall settings and click Add at the bottom of the page to add a new zone for the vpn. Set it up as,
Input: reject
Output: accept
Forward: reject
Masquerading: Yes
Covered network: vpn (or as you called it in Step 7.)

New firewall zone settings for the vpn interface
New firewall zone settings for the vpn interface.
When done, save changes and the following should be present in the Firewall zones.

Firewall Zones settings
Firewall Zones settings.

Step 10.

If changes did not take immediately effect, reboot router. Make sure to save all changes first!
Reboot OpenWRT
Reboot OpenWRT.
Just to check that everything works and packets are going through the PPtP tunnel, proceed to chapter Check Packet Route  below.

Configuring over SSH

You will need to edit 3 files in total (assuming again a stock, unmodified OpenWRT installation) to apply all changes required. These are,
  • /etc/config/network
    Holding the general router interface configurations.
  • /etc/config/wireless
    Responsible for the wireless interface, including WiFi SSID and encryption settings.
  • /etc/config/firewall
    Responsible for assigning different interfaces into different firewall zones (applies different rules to them) and to allow traffic forwarding between interfaces.
Important: Basic vi editing skills are required, once again Here is a cheat sheet for your convenience.
  1. Connect to your OpenWRT router via an ethernet cable and follow the steps from a terminal window.
  2. telnet 192.168.1.1
  3. passwd
    This step sets a password for your router (this will also be the password for the LuCi interface if you wish to use that later!) and also disables telnet further on and enables ssh. Use it as ssh root@192.168.1.1 from this point onwards.
  4. vi /etc/config/network
    Add changes to file from section below!
  5. vi /etc/config/wirelessAdd changes to file from section below!
  6. vi /etc/config/firewallAdd changes to file from section below!
  7. /etc/init.d/dnsmasq disable
  8. reboot
  9. Disconnect the router from your computer and connect it to the primary router through one of its LAN (not WAN) ports.
Copy pasting the settings from below will most likely get you up and running in no time.

/etc/config/network

config interface 'loopback'
    option ifname 'lo'
    option proto 'static'
    option ipaddr '127.0.0.1'
    option netmask '255.0.0.0'

config interface 'lan'
    option force_link '1'
    option type 'bridge'
    option proto 'static'
    option netmask '255.255.255.0'
    option ip6assign '60'
    option ipaddr '192.168.1.2'
    option gateway '192.168.1.1'
    option dns '192.168.1.1'
    option delegate '0'
    option _orig_ifname 'eth0 wlan0'
    option _orig_bridge 'true'
    option ifname 'eth0 gretap0'

config interface 'vpn'
    option proto 'pptp'
    option server 'IP_OF_YOUR_PPTP_SERVER'
    option delegate '0'
    option username 'USERNAME'
    option password 'PASSWORD'

/etc/config/wireless

 config wifi-device 'radio0'
    option type 'mac80211'
    option hwmode '11g'
    option path 'platform/ar933x_wmac'
    option channel 'auto'
    option txpower '10'
    option country 'DE'

config wifi-iface

    option device 'radio0'
    option mode 'ap'
    option ssid 'NETWORK_SSID'
    option encryption 'psk-mixed'
    option key 'PASSWORD'
    option network 'lan'

Note: The wifi-device may be called different on other routers. Usually the config wifi-device section can be left "as is" and the actual wireless SSID and encryption is set up solely in config wifi-iface.

/etc/config/firewall

config defaults
    option syn_flood '1'
    option input 'ACCEPT'
    option output 'ACCEPT'
    option forward 'REJECT'

config zone
    option name 'lan'
    option input 'ACCEPT'
    option output 'ACCEPT'
    option forward 'ACCEPT'
    option masq '1'
    option network 'lan'

config zone
    option name 'wan'
    option input 'REJECT'
    option output 'ACCEPT'
    option forward 'REJECT'
    option masq '1'
    option mtu_fix '1'
    option network 'wan wan6'

config forwarding
    option src 'lan'
    option dest 'wan'

config rule
    option name 'Allow-DHCP-Renew'
    option src 'wan'
    option proto 'udp'
    option dest_port '68'
    option target 'ACCEPT'
    option family 'ipv4'

config rule
    option name 'Allow-Ping'
    option src 'wan'
    option proto 'icmp'
    option icmp_type 'echo-request'
    option family 'ipv4'
    option target 'ACCEPT'

config rule
    option name 'Allow-IGMP'
    option src 'wan'
    option proto 'igmp'
    option family 'ipv4'
    option target 'ACCEPT'

config rule
    option name 'Allow-DHCPv6'
    option src 'wan'
    option proto 'udp'
    option src_ip 'fe80::/10'
    option src_port '547'
    option dest_ip 'fe80::/10'
    option dest_port '546'
    option family 'ipv6'
    option target 'ACCEPT'

config rule
    option name 'Allow-MLD'
    option src 'wan'
    option proto 'icmp'
    option src_ip 'fe80::/10'
    list icmp_type '130/0'
    list icmp_type '131/0'
    list icmp_type '132/0'
    list icmp_type '143/0'
    option family 'ipv6'
    option target 'ACCEPT'

config rule
    option name 'Allow-ICMPv6-Input'
    option src 'wan'
    option proto 'icmp'
    list icmp_type 'echo-request'
    list icmp_type 'echo-reply'
    list icmp_type 'destination-unreachable'
    list icmp_type 'packet-too-big'
    list icmp_type 'time-exceeded'
    list icmp_type 'bad-header'
    list icmp_type 'unknown-header-type'
    list icmp_type 'router-solicitation'
    list icmp_type 'neighbour-solicitation'
    list icmp_type 'router-advertisement'
    list icmp_type 'neighbour-advertisement'
    option limit '1000/sec'
    option family 'ipv6'
    option target 'ACCEPT'

config rule
    option name 'Allow-ICMPv6-Forward'
    option src 'wan'
    option dest '*'
    option proto 'icmp'
    list icmp_type 'echo-request'
    list icmp_type 'echo-reply'
    list icmp_type 'destination-unreachable'
    list icmp_type 'packet-too-big'
    list icmp_type 'time-exceeded'
    list icmp_type 'bad-header'
    list icmp_type 'unknown-header-type'
    option limit '1000/sec'
    option family 'ipv6'
    option target 'ACCEPT'

config include
    option path '/etc/firewall.user'

config rule
    option src 'wan'
    option dest 'lan'
    option proto 'esp'
    option target 'ACCEPT'

config rule
    option src 'wan'
    option dest 'lan'
    option dest_port '500'
    option proto 'udp'
    option target 'ACCEPT'

config zone
    option name 'vpn'
    option output 'ACCEPT'
    option network 'vpn'
    option masq '1'
    option input 'REJECT'
    option forward 'REJECT'

config rule
    option target 'ACCEPT'
    option src 'lan'
    option dest 'vpn'
    option name 'VPN'
    option family 'ipv4'

Check Packet Route

After the router boots up, one can validate if traffic indeed travels through the PPtP tunnel by,
  • traceroute command from your computer once connected to the MR3020
  • In the LuCi interface under Status/Route
  • In the LuCi interface under Network/Diagnostic/Traceroute
If the configuration was successful the packets should take a route similar to the following:
10.*.*.* ==> 192.168.1.2 ==> 192.168.1.1 ==> ISP and DNS servers

Troubleshooting

Failsafe mode

Referring to the hardware specific Failsafe instuctions on the OpenWRT Wiki the process is the following:
  1. Turn off your MR3020
  2. Set your computer's ethernet IP address to 192.168.1.2 (static). In Ubuntu go to Network connections/Wired/Wired (or Cable, depending how it is named) and click Edit.
    Network connections in Ubuntu.
    Setting a static IP address to the ethernet interface in Ubuntu.Netmask can be 255.255.255.0, gateway 192.168.1.1
  3. Disconnect your computer from other networks.
  4. Connect your computer to the MR3020 via an ethernet cable.
  5. Power up the MR3020.
  6. When the WPS button starts blinking during boot, press it. It should start blinking faster. The router is now in Failsafe mode.
  7. In a terminal window type,
    telnet 192.168.1.1
    Note: Even if you have previously set a password to enable ssh, in Failsafe mode only telnet works.
  8. To enable editing files type,
    mount_root

Restore to stock OpenWRT

If you have lost track of configurations, sometimes it is easier to simply start over. If you have access to your router via telnet or ssh you can use the following to reset back to factory OpenWRT settings.
  1. Access your router in Failsafe mode and execute the following commands
  2. mount_root
  3. mtd -r erase rootfs_data
    (Your router might reboot automatically after this step, hence making step 4 unnecessary.)
  4. reboot -f

Summary

I hope this has helped you save some time and get your network up and running. If you have any remarks or questions I would be happy to take them. Leave a comment if you are happy about the guide or unsure about something.

Sunday, November 1, 2015

Gridcoin Headless Wallet on Ubuntu (VPS)

I got into Gridcoin [1] at about the start of 2015 if I remember correctly, a cryptocurrency based on BOINC [2]. Users are no longer doing "useless" hashing work, but rather contribute to space, medical or other useful science topics by donating computing power. Now, with the help of Gridcoin, contributors can get a "payment" for their work on white-listed projects.

Since the Gridcoin Project uses both Proof of Work (technically "Proof of Research", aka PoR) and Proof of Stake schemes at the same time, it is beneficial to have a node running to stake coins and earn interest on them.  

Summary
  • How to install gridcoinresearchd (compiling & .deb)
  • Automatically unlock wallet for staking
  • Wallet upgrade (automatic & manual)

Getting a VPS Server

I bought a server with the features listed below for about 20 €/year (don't remember exactly as I bought a cheaper package first and then upgraded) from time4VPS (affiliate link). I can say I am satisfied with their service. They have great support, astonishing prices, upgrading servers work seamlessly and really easy setup. Perfect uptime so far and low ping within the EU, even my small mumble server has a ping around 80 ms.
  • 2.4 GHz CPU core
  • 1024 MB RAM (+ 512 MB of fixed SWAP)
  • 40 GB HDD
  • 400 Mbit/s port connection (dedicated)
  • 1 TB monthly traffic

Installing Gridcoin-Research

This will be a guide on how to install gridcoinresearchd, that is the gridcoin-research daemon. This is a headless version of the client, that is there will be no GUI for configuration or inspection. However, this is not even needed if you just want to run a client and know that it works. Three ways of installing I have covered here are,
  1. Pull from git and compile
  2. Use pre-compiled .deb packages for Ubuntu
  3. Add PPA to your system (simplest)

Compile from git repository

Installing the client is well-described on the Github page and on the official site of the project [3] [1] and following it step-by-step will result in a perfect installation. I copied here the important commands relevant for installing it on an Ubuntu VPS.
  1. sudo apt-get install ntp git build-essential libssl-dev libdb-dev libdb++-dev libboost-all-dev libqrencode-dev
  2. git clone https://github.com/gridcoin/Gridcoin-Research
  3. cd ~/Gridcoin-Research/src
  4. chmod 755 leveldb/build_detect_platform 
  5. make -f makefile.unix USE_UPNP=- 
  6. strip gridcoinresearchd
    sudo install -m 755 gridcoinresearchd /usr/bin/gridcoinresearchd
After this the daemon can be run from the terminal with the command,
gridcoinreserachd

Pre-compiled packages

Turns out that the compiler keeps getting out of RAM during the process and fails. So instead of compiling it on my own, I have decided (for now) to download pre-compiled .deb packages from launchpad. The latest compiled package can be downloaded from : https://code.launchpad.net/~caraka/+recipe/gridcoin-daily.

Select the one that matches your distribution and architecture and grab the link. Then on your server e.g.,
wget  https://code.launchpad.net/~gridcoin/+archive/ubuntu/gridcoin-daily/+build/8190699/+files/gridcoinresearchd_3.5.2.1-r166%7Eubuntu14.04.1_amd64.deb

This will save into gridcoinresearchd_3.5.2.1-r166~ubuntu14.04.1_amd64.deb. Now I had a problem here with the "~" in the name, so what I usually do is replace it with a "-" to avoid issues when installing directly with dpkg.
mv gridcoinresearchd_3.5.2.1-r166~ubuntu14.04.1_amd64.deb gridcoinresearchd_3.5.2.1-r166-ubuntu14.04.1_amd64.deb
And lastly,
sudo dpkg -i gridcoinresearchd_3.5.2.1-r166-ubuntu14.04.1_amd64.deb
After this the daemon can be run from the terminal with the command,
gridcoinreserachd

Adding PPA to your system

Just recently I found that I can also install the Gridcoin daemon via PPA. From https://launchpad.net/~gridcoin/+archive/ubuntu/gridcoin-daily. This is probably less fancy than compiling from the source, but definitely faster.
Code to add Gridcoin PPA to your system
Simply,
sudo add-apt-repository ppa:gridcoin/gridcoin-daily
sudo apt-get update
sudo apt-get install gridcoinresearchd 

After this the daemon can be run from the terminal with the command,
gridcoinreserachd
And the next time you run
sudo apt-get update
sudo apt-get upgrade
to update your system, gridcoinresearchd will also be automatically upgraded.

Note: If you got a VPS from Time4VPS you first have to run sudo apt-get install software-properties-common python-software-properties before you can add-apt-repository.

Unlocking the Wallet for Staking

In order to stake coins - receive interest on the coins in your wallet - the wallet must be unlocked [9]. Of course, this only applies if your wallet is encrypted, which it should be (!) if you are storing it on a remote server! For obvious reasons.

The problem is, in order to unlock it, you have to type the password in your ssh session. This is secure. Unless someone gets access to your VPS server when he/she can check the terminal history (history) and your password is out. The solution is to use the autounlock feature in the config and provide an encrypted password. This will automatically unlock your wallet upon start.

Go to your desktop wallet and in the debug console do the following
execute encrypt YourwalletPassword
and add a last line to your gridcoinresearch.conf file
autounlock=looooongmumbojumboencryptedpassphrase

So you are essentially using an encrypted password that your client can decrypt and prove that it is indeed the correct password and so unlocks your wallet for staking. Pretty cool, huh? So even if someone has access to your VPS, they won't have your wallet passphrase.


Note: The password hashing algorithm takes a salt from the computer's CPU and hard drive. This means that the hash has to be generated on the machine where the wallet will run and as such the hash will be unique to that machine. (The same passphrase will result in different hashes on different computers!)

Config file

I have stripped down my config file and currently use only a minimal version. To edit your gridcoinresearch.conf file,
nano ~/.GridcoinResearch/gridcoinresearch.conf
The following lines need to be present,
email=YourEmailAddressHere
rpcuser=whatever_you_want_you_dont_have_to_remember_it    rpcpassword=whatever_you_want_you_dont_have_to_remember_it
addnode=node.gridcoin.us
addnode=typh00n.net
addnode=gridcoin.asia
autounlock=looooongmumbojumboencryptedpassphrase
maxconnections=45
server=1
daemon=1
After this you should be able to run gridcoinresearchd and get some connections soon. Maybe not right away, but check back in 10-30-60 minutes and see if it works.

Note: The rpcuser and rpcpassword fields are necessary for the headless (gridcoin-researchd) client, you will get an error if these are not present. The "addnode" entries should be purely optional, peers should be found even without these entries.

Tip: "gridcoinresearchd" is a system command now and can be called quickly by starting to type it "grid..." and pressing [TAB]. Also, type gridcoinresearchd help to get a list of available commands with the headless client.

Keeping Gridcoin Updated

Upgrading for self-compiled client

I have written a scrip for myself to upgrade the client, based on the Github Linux guide [3] again. The script upgrades the client if it is installed in the "default" location (that is where I have installed it) in ~/Gridcoin-Reserach/. The script can then be added to the aliases file and simply run with a command. I personally like having a ~/MyScripts directory on my systems where I have a collection of scripts doing a range of things. I call this one ~/MyScripts/grcupgrade.sh and has the following in it.
#!/bin/bash
#Script to Upgrade Gridcoin-Research client
###Config###
#Install directory
Dir=/home/YourUsernameHere/Gridcoin-Research/

###Config END###

#Defining some colours for message output
red='\033[0;31m'
NC='\033[0m'

#Stop gridcoinresearch if running
gridcoinresearchd stop
#Go to the install Directory
cd $Dir
#Git update
echo "${red}Pulling Changes from Git Repository...${NC}"
sudo git fetch --all
sudo git reset --hard origin/master
echo "${red}Git Repository Updated!${NC}"
cd $Dir/src
chmod 755 leveldb/build_detect_platform
#Makefile
echo "${red}Making makefile.unix! This may take a while!${NC}"
make -f makefile.unix USE_UPNP=-
echo "${red}Makefile ready.${NC}"
strip gridcoinresearchd
sudo install -m 755 gridcoinresearchd /usr/bin/gridcoinresearchd
echo "${red}Upgrade finished. You can start Gridcoin-Research now\nby running 'gridcoinresearchd' ${NC}"
#Uncomment the following line to automatically run gridcoinresearchd upon finishing the client update
#gridcoinresearchd

After copying this into the file remember to make the file executable with,
sudo chmod +X ~/MyScripts/grcupgrade.sh
Then we can add an alias to call this script for the simple command grcupgrade. This file doesn't exist by default, so it will be likely empty if you haven't added commands to it before.
sudo nano ~/.bash_aliases
And add the following line to the file,
alias grcupgrade='sudo sh ~/MyScripts/grcupgrade.sh'
Save with Ctrl+O and exit with, Ctrl+X. Then run the following command (or reboot if you wish) to apply changes made to the aliases file.
source ~/.bashrc
After this the upgrade script can be run by simply issuing the 
grcupgrade
command. If you want gridcoinresearchd to start at the end of the client upgrade then you can uncomment the last line in the bash script. A further step is that you can run a cronjob to run this script, say once every week to make sure that your client gets upgraded.

Upgrading when installed via PPA

If you have added the gridcoin-daily PPA to your system, then as mentioned earlier, your gridcoin client will be upgraded the next time you do
sudo apt-get update
sudo apt-get upgrade

Troubleshooting

Resource usage

From personal experience I can say that running on 512 MB of system RAM is not going to work. I had multiple wallet crashes due to "out of memory" error. Therefore I would recommend a minimum of 1 GB for simply running the client (not compiling!). I think CPU power for running a simple wallet is not that much important, it mainly influences the time it takes to make the wallet from the git source. Even a Raspberry Pi's CPU can handle it.

If one wants to compile the client from the git repository as mentioned above, I would suggest having at least 2 GB of system RAM. Although, I cannot confirm if this would truly be enough. I personally am pulling the deb packages and installing it with dpkg for the moment.

Compiler error

Even though it should be simple to compile, I ran into a problem. The compiler ran for a while and then gave back a weird-looking error:
g++: internal compiler error: Killed (program cc1plus)
Please submit a full bug report,
with preprocessed source if appropriate.
See <file:///usr/share/doc/gcc-4.6/README.Bugs> for instructions.
 Turns out this happens when it runs out of RAM. Command dmesg returned
[241411.374594] Out of memory in UB 8727: OOM killed process 11475 (cc1plus) score 0 vm:734444kB, rss:493656kB, swap:207248kB
I started investigating the use of a larger swap file [8], however for obvious reasons, the server restricts this (otherwise anyone could get e.g. 4 GB extra RAM for free). So I tried shutting down unnecessary services, apache, my mumble server and I even tried increasing swappiness. This was also set to 1, and cannot be changed. Again, because of server configuration and the virtualization.

Further help

gridcoinresearchd help
And of course, feel free to leave a comment if you find this useful or you got stuck somewhere.

Extras

Some extras briefly mentioned that are actually required, but beyond the scope of the article.

Automatic updates (cronjob)

Setting up a cronjob for the updater script is a good idea. Here is an example on how to set it to run once a week. Cron takes the following syntax,

Minute Hour Day_of_Month Month Day_of_Week Command
47 6 * * Sun grcupgrade
For example the above code would run the upgrade script every Sunday at 06:47.

Encrypt your wallet.dat

If you have a local Gridcoin wallet on your machine and would like to use the same on a VPS, you should encrypt it. This can be done through the GUI in Settings/Encrypt Wallet. Make sure to use a sufficiently strong password.

Copy an existing wallet.dat file to the server

If you have encrypted your wallet.dat file as mentioned above, it should be safe to copy it to a remote VPS server. This can be done securely with scp,
scp ~/GridcoinResearch/wallet.dat user@vps.server:/home/user/GridcoinResearch/
user: your username on the VPS server
vps.server: IP address or domain name of your VPS server

References

Tuesday, June 30, 2015

Internal Server Error on ownCloud Ubuntu Server 14.04

I have followed the automatic installation tutorial for ownCloud,[1] from software.opensuse.org,[2]. Needless to say, it didn't go as smooth as apt-get install and enjoy. After installing, enabling SSL with a self-signed certificate and using the absolute default settings I was greeted with a not so nice message below.
Internal server error message when trying to access mydomain.com/owncloud

Solution

After quite a bit of searching the solution was to add he following lines to the config file /etc/apache2/apache2.conf,[3].
<Directory /var/www/>
   Options Indexes FollowSymLinks
   AllowOverride All
   Require all granted
</Directory>
Simple edit the file by
sudo nano /etc/apache2/apache2.conf
and add the mentioned lines to the end of the file.

Save changes with CTRL+O, exit with CTRL+X. Then restart apache2 with
sudo service apache2 restart
Or in case you are running Ubuntu 12.04
sudo /etc/init.d/apache2 restart
Your error should be fixed and ownCloud ready to be used.

Sources

[1] - ownCloud.org
[2] - https://software.opensuse.org/download.html?project=isv:ownCloud:community&package=owncloud
[3] - http://sharadchhetri.com/2014/01/16/how-to-install-owncloud-6-in-ubuntu-13-10-server/

Saturday, June 27, 2015

Install & Configure Mumble Server (Murmur) on Ubuntu

"Mumble is a voice chat application for groups. While it can be used for any kind of activity, it is primarily intended for gaming. It can be compared to programs like Ventrilo or TeamSpeak. People tend to simplify things, so when they talk about Mumble they either talk about "Mumble" the client application or about "Mumble & Murmur" the whole voice chat application suite." [1]

Recently my Raspberry Pi broke down at home that was serving a small Mumble server (this is called Murmur). Since I am away from home I cannot fix it so I have decided to buy a VPS sever and run it off from there. I have found an amazing VPS provider that sells VPS plans starting from 9.99€/year with decent configuration (Affiliate link). This guide is for all those who want to easily set up and configure a server "ready to go" as fast as possible.

Installation

Installing Murmur (mumble server) is straightforward in Ubuntu, it can be done via the pat repository through apt-get commands.
Update your repository and packages that might be out of date
sudo apt-get update
sudo apt-get upgrade
Install and do an initial configuration on mumble-server
sudo apt-get install mumble-server
sudo dpkg-reconfigure mumble-server
The images below show what you will be prompted when running the dpkg-reconfigure command.
Select yes if you want mumble-server to start upon boot. This is a useful feature just in case the server or your OS crashes and otherwise you would forget to start your services.
Generally set this to "yes" as well to increase performance and audio quality of your server.
Finally, set a SuperUser password. This will be only used for logging in with the root account called "SuperUser" and administering channel properties.


The mumble server is now up and running, however it is not fully configured. Next is to set server password, audio quality, port and so on. Proceed to the next step.

Configure your Server

Mumble server has a single configuration file for interest for us located in /etc/mumble-server.ini. This file has to be edited with any kind of text editor of your liking.The configuration file is self-explanatory and there is also a complete documentation on it [2].
sudo nano /etc/mumble-server.ini
There are many settings here that you can tweak, however the  most important ones (for a quick setup at least) are the following.

welcometext

This is the welcome message that will be displayed to clients when joining the server. The mumble client shows this message in the standard message window on the left side of the client.
welcometext="your welcome message comes here"
You can use standard html syntaxin the message to display something more than a plain text. Some examples:
<b>bold</b> - makes enclosed text bold
<i>italic</i>  - makes enclosed text italic
<br /> - inserts a line break

port

The port where users have to connect to the server. If you change the default port, make sure to let your users know.
port=64738

serverpassword

Quite obviously, this is the server password users need to connect. Set it to something strong as the client is able to remember it, so users will not be promoted to enter this on every connection.
serverpassword=superstrongpasswordyeah

bandwidth

This is the audio bandwidth per user. The default is 70'000 bits/s and the higher you set this, the better the audio quality. Setting it higher to 130'000 has no effect, I usually go with 128'000 bits/s.
bandwidth=128000

users

Defines the maximum number of users allowed on the server. If you are running a small server for a handful of people, this probably isn't so important for you, although setting it to 20-50 wouldn't hurt anyway. It becomes important when you are running a larger server and your bandwidth is limited.
users=50

Apply Changes

In order for the changes to take effect you have to restart the mumble server
sudo service mumble-server restart
There are of course a lot more settings, but these initial points are probably the most important. Feel free to play around.

Managing Channels

Once everything has been set up on the server side it is time to log in with a client and start configuring the channels. For starters, there will only be 1 root channel on the server.By default only the SuperUser (the mumble servers "root" user) has the right to add, delete and edit channels. So it is useful to give your account (the one you will personally use on your server) administrator rights. This saves the hassle of logging in all the time with the root account. To do this, follow these steps, which are also nicely explained in the wiki [3].

  1. Open a mumble client, navigate to Configure/Settings and check the "Advanced" checkbox at the bottom left corner.
    Configure/Settings window after enabling Advanced view by checking the checkbox at the bottom left corner of the window.
  2. Pick a username and connect to your server at the server's IP address, with the specified port and server password. 
  3. Click on Self/Register, which will lock your username on the server.
  4. Disconnect from the server.
  5. Reconnect to the server, however use the following username & password,
    username:SuperUser
    password:<the one you set in dpkg-reconfigure mumble-server>

    In case you forgot the SuperUser password, don't worry. Log in to your server and re-run sudo dpkg-reconfigure mumble-server

    At this point you should be logged in as SuperUser and you have the right to create and edit channels. Simply right-click a channel and see what options you have.
  6. To give administrator rights to your user account select the root channel, right-click and select Edit.
  7. Go to the Groups tab and select admin from the dropdown menu. Then at the bottom of the window type your username into the field and click Add. See the image below.
    Root>Edit>Group window showing my user account added to the admin group. Afterwards, I can edit channels with my everyday user account.  
  8. Save changes by clicking OK. Now you can simply log out and log back in with you user account.
Editing channels is simply done by right-click/edit. You can also add new channel and sub-channels by selecting Add from the menu. Configure a server and channel structure of your liking!

But wait! There's more!

If you want to learn more about channel settings, groups and administration I strongly suggest watching the video below (10 minutes and you learn a lot). Groups and permissions are nicely explained and you can configure your server pretty good if you follow what is shown in the video.


If you have any questions, leave a comment below and I'll get back to you as soon as possible.

Sources

[1] - http://wiki.mumble.info/wiki/FAQ
[2] - http://wiki.mumble.info/wiki/Murmur.ini
[3] - http://wiki.mumble.info/wiki/Murmurguide#Becoming_Administrator_and_Registering_a_User